Wireshark解析器Lua脚本
Wireshark集成了Lua解释器,以支持Lua脚本(自己编译的话根据编译配置决定是否支持Lua)。
启动wireshark,依次点击“Help”,”About Wireshark“菜单,在打开的对话框中的”Wireshark”标签页上观察版本信息,如果如下图一样显示With Lua,说明此版本支持Lua插件。
然后打开wireshark主目录下的init.lua文件,确保disable_lua的值为false,即开启了lua:

因实际工作中需要对一种非官方的自研协议进行解析,每次可能需要对传输的内容进行对比,为了方便需要利用wireshark工具进行分析。恰好,Wireshark 可以利用其暴露的 Lua API 对抓包数据进行分析。
基础知识
Lua
Lua是一种轻量级的脚本语言,解释执行,不需要编译器之类的。基本语法可参考 Lua W3CSchool
Wireshark内置了对Lua脚本的支持,可以直接编写Lua脚本,无需配置额外的环境。使用起来方便。 Wireshark Developer’s Guide里的第10章和第11章都是关于Lua支持的文档。
使用Lua编写Wireshark协议解析插件,有几个比较重要的概念:
Dissector: 中文直译是解剖器,就是用来解析包的类,为了解析一个新协议,我们需要编写的也是一个Dissector。DissectorTable: 解析器表是Wireshark中解析器的组织形式,是某一种协议的子解析器的一个列表,其作用是把所有的解析器组织成一种树状结构,便于Wireshark在解析包的时候自动选择对应的解析器。例如TCP协议的子解析器 http, smtp, sip等都被加在了"tcp.port"这个解析器表中,可以根据抓到的包的不同的tcp端口号,自动选择对应的解析器。
Wireshark是用C编写的,Wireshark的剖析器通常也是用C编写的。然而,Wireshark有一个Lua实现,这使得不熟悉C的人很容易编写剖析器。对于那些不熟悉Lua的人来说,它是一种非常轻量级的编程语言,旨在作为脚本语言在应用程序中实现,以扩展其功能。
Wireshark 支持
Wireshark 天然对 Lua 有良好的支持性,且Lua在Wireshark中可以做的事情也有很多,详见Wireshark Lua Example
网上的教程是点击 Help –> About Wireshark –> Folders,查找 Wireshark 的lua脚本存放目录。
但是实际上我找到的敌方有些不同,不过亲测有效。该目录下有一个 init.lua
# Linux
/usr/share/wireshark
# Mac
/Applications/Wireshark.app/Contents/Resources/share/wireshark将init.lua 文件末加上, dofile(DATA_DIR.."your_lua_script")
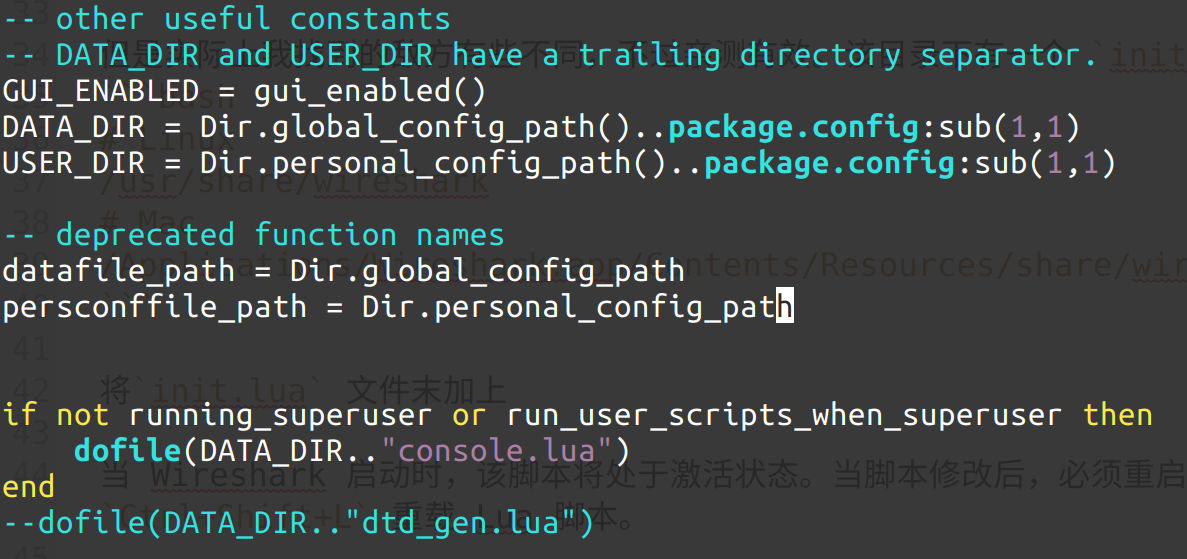
当 Wireshark 启动时,该脚本将处于激活状态。当脚本修改后,必须重启 Wireshark, 或者按 Ctrl+Shift+L (Mac 下Shift+Command+L) 重载 Lua 脚本。
Lua API
在 Lua API 之前先看一个Lua 解析脚本的示例。参考 自己动手编写Wireshark Lua插件解析自定义协议
do
    --协议名称为DT,在Packet Details窗格显示为Nselab.Zachary DT
    local p_DT = Proto("DT","Nselab.Zachary DT")
    --协议的各个字段
    local f_identifier = ProtoField.uint8("DT.identifier","Identifier", base.HEX)
    --这里的base是显示的时候的进制,详细可参考https://www.wireshark.org/docs/wsdg_html_chunked/lua_module_Proto.html#lua_class_ProtoField
    local f_speed = ProtoField.uint8("DT.speed", "Speed", base.HEX)

    --这里把DT协议的全部字段都加到p_DT这个变量的fields字段里
    p_DT.fields = {f_identifier, f_speed}

    --这里是获取data这个解析器
    local data_dis = Dissector.get("data")

    local function DT_dissector(buf,pkt,root)
        local buf_len = buf:len();
        --先检查报文长度,太短的不是我的协议
        if buf_len < 16 then return false end

        --验证一下identifier这个字段是不是0x12,如果不是的话,认为不是我要解析的packet
        local v_identifier = buf(0, 1)
        if (v_identifier:uint() ~= 0x12)
        then return false end

        --取出其他字段的值
        local v_speed = buf(1, 1)

        --现在知道是我的协议了,放心大胆添加Packet Details
        local t = root:add(p_DT,buf)
        --在Packet List窗格的Protocol列可以展示出协议的名称
        pkt.cols.protocol = "DT"
        --这里是把对应的字段的值填写正确,只有t:add过的才会显示在Packet Details信息里. 所以在之前定义fields的时候要把所有可能出现的都写上,但是实际解析的时候,如果某些字段没出现,就不要在这里add
        t:add(f_identifier,v_identifier)
        t:add(f_speed,v_speed)

        return true
    end

    --这段代码是目的Packet符合条件时,被Wireshark自动调用的,是p_DT的成员方法
    function p_DT.dissector(buf,pkt,root)
        if DT_dissector(buf,pkt,root) then
            --valid DT diagram
        else
            --data这个dissector几乎是必不可少的;当发现不是我的协议时,就应该调用data
            data_dis:call(buf,pkt,root)
        end
    end

    local udp_encap_table = DissectorTable.get("udp.port")
    --因为我们的DT协议的接受端口肯定是50002,所以这里只需要添加到"udp.port"这个DissectorTable里,并且指定值为50002即可。
    udp_encap_table:add(50002, p_DT)
end
如上图就是一个标准的协议解析流程。下面我们做一个详细的流程梳理。
1. Proto
官方文档:11.6.5. Proto :
表示一个新的Protocol,在Wireshark中Protocol对象有很多用处,解析器是其中主要的一个。主要接口有:
| 接口 | 说明 |
|---|---|
| proto:__call(name, desc) | 创建Proto对象。name和desc分别是对象的名称和描述,前者可用于过滤器等 |
| Proto.new(name, desc) | 创建一个Proto对象 |
| proto:register_heuristic(listname, func) | 创建一个启发式解析器(启发式解析器) |
| proto.dissector | 解析函数,3个参数tvb,pinfo,tree,分别是报文内容,报文信息和解析树结构 |
| proto.prefs | 解析器的首选项 |
| proto.init | 初始化 |
| proto.name | 该解析器的名字 |
| proto.description | 该解析器的描述 |
| proto.fields | 该解析器的内容(返回 ProtoFeild 表) |
| proto.experts | 该解析器的专家信息 |
举例:
local NAME = "bvc_srt"
local bvc_srt = Proto(NAME, "BVC_SRT Protocol")

-- 创建 bvc_srt 协议首选项
srt_dev.prefs["srt_udp_port"] = Pref.uint("SRT UDP Port", 1935, "SRT UDP Port")

-- 注册解析器, 将 bvc_srt 自定义协议挂载到 udp 1935 端口上
DissectorTable.get("udp.port"):add(1935, bvc_srt)

-- 也可以直接调用下面函数,每个数据包都会用该 bvc_srt 去解析
-- register_postdissector(bvc_srt)
2.ProtoField
表示协议字段,一般用于解析字段后往解析树上添加节点。根据字段类型不同,其接口可以分为两大类。
这些接口都会返回一个新的字段对象。方括号内是可选字段,花括号内是可替换的类型字段。
字段可以是 uin8\uin16\uin64\string\char 等等
如下所示:
ProtoField.uint8(abbr, [name], [base], [valuestring], [mask], [desc])
- abbr: 协议字段缩写,比如
bvc_srt.time_stamp、http.port - name: 字段的实际名字,比如
Time Stamp、HTTP Port - base: 展示的形式,比如时间戳、端口号 是一个int64的十进制数字就可以填
base.DEC,再或者魔术值是一个 16进制数,可以填base.HEX, 或者是HTTP的Header是字符串,可以填base.STRING - valuestring: 与值对应的文本表,比如TCP的Flag有 9 位,每一位的对应关系就在这里体现。
- mask: 掩码,与valuestring配合,主要解决的是TCP Flag 的那种情况。
- desc: 描述
举例:
fields.peer_ipaddr = ProtoField.ipv4("bvc_srt.peer_ipaddr", "Peer IP address")

-- 添加到树的时候要注意
-- 如果是网络序,要使用add_le,而不是add
``` lua
local flag_select = {[0]="[Not Set]",[1]="[Set]"} fields.tcp_flag_reserved = ProtoField.uint16(“tcp.flag.reserved”, “Reserved”, base.HEX, flag_select, 0x1000)
– TCP Flag 需要 3 字节,这样处理解析器即可, 0b00010000000 做掩码。 data_flag_info_tree:add(fields.tcp_flag_reserved, tvb(offset, 3))
<img src="https://img1.kiosk007.top/static/images/wireshark/proto_field_tcp.png">


## 3.TVB

TVB 是 `proto.dissector(tvb, pinfo, treeitem)` 的第一个参数,我们将在 `proto.dissector` 函数里做我们的协议解析。

[Tvb(Testy Virtual Buffer)](https://www.wireshark.org/docs/wsdg_html_chunked/lua_module_Tvb.html#lua_class_Tvb)表示报文缓存,也就是实际的报文数据,可以通过下面介绍的TvbRange从报文数据中解出信息。主要接口有:

| 接口        | 说明     |
| --------   | -----:   |
| tvb:__tostring() | 将报文数据转化为字符串,可用于调试 |
| tvb:reported_len() | get tvb的(not captured)长度 |
| tvb:len() | get tvb的(captured)长度 |
| tvb:reported_length_remaining() | 获取当前tvb的剩余长度,如果偏移值大于报文长度,则返回-1 |
| tvb:offset() | 返回原始偏移 |
| tvb:raw() | 获取tvb中二进制字节的Lua字符串 |


用法举例:
``` lua
-- tvb(offset, 4)表示从offset开始之后的4个字节
subtree:add_le(fields.peer_ipaddr, tvb(offset, 4))
4.TvbRange
表示Tvb的可用范围,常用来从Tvb中解出信息。主要接口有
| 接口 | 说明 |
|---|---|
| tvb:range([offset], [length]) | 从tvb创建TvbRange,可选参数分别是偏移和长度,默认值分别是0和总长度 |
| tvbrange:{type}() | 将tvbrange所表示范围内的数据转换成type类型的值,type包括但不限于:uint,uint64,int,int64,float,ipv4,ether,nstime,string,ustring,bytes,bitfield等,其中某些类型的方法可以带一些参数 |
很少在实际使用中用到,大多数会取整个 tvb 进行运算位移。
5. ByteArray
字节数组,可与Tvb互相转换。另外字符串也可以换成 ByteArray ,进而换成 Tvb。
| 接口 | 说明 |
|---|---|
| ByteArray.new([hexbytes], [separator]) | 创建一个新 ByteArray 对象 |
| bytearray:__concat(first, second) | 连接两个 ByteArray |
| bytearray:append(appended) | 将 ByteArray 追加到此 ByteArray |
| bytearray:len() | 获取 ByteArray 的长度 |
| bytearray:subset(offset, length) | 获取 ByteArray 的一段,作为新的 ByteArray |
| bytearray:base64_decode() | 获取 Base64 解码的 ByteArray |
| bytearray:__tostring() | 获取包含 ByteArray 中的字节的 Lua 字符串,以便可以在显示过滤器中使用它 (例如 “01FE456789AB”) |
| bytearray:tvb(name) | ByteArray 转Tvb |
| bytearray:raw([offset], [length]) | 获取 ByteArray 中的二进制字节的 Lua 字符串 |
用法举例:
function proto_foo.dissector(buf, pinfo, tree)
            -- Create a new tab named "My Tvb" and add some data to it
            local b = ByteArray.new("11223344")
            local tvb = ByteArray.tvb(b, "My Tvb")

            -- Create a tree item that, when clicked, automatically shows the tab we just created
            tree:add( tvb(1,2), "Foo" )
 end
6. Pinfo
报文信息(packet information)。主要接口有:
| 接口 | 说明 |
|---|---|
| pinfo.len pinfo.caplen | get报文长度 |
| pinfo.abs_ts | get报文捕获时间 |
| pinfo.number | get报文编号 |
| pinfo.src pinfo.dst | get/set报文的源地址、目的地址 |
| pinfo.columns pinfo.cols | get报文列表列(界面) |
用法举例:
-- 修改协议名称(效果见下图)
pinfo.cols.protocol = bvc_srt.name
-- 为报文的信息尾部添加字符串(效果见下图)
pinfo.cols.info:append(" [ACK]")
-- 还有一种便是直接覆盖
pinfo.cols.info = "[ACK]"
7. TreeItem
表示报文解析树中的一个树节点。主要接口有:
| 接口 | 说明 |
|---|---|
| treeitem:add([protofield], [tvbrange], [value], [label]) | 向当前树节点添加一个子节点 |
| treeitem:set_text(text) | 设置当前树节点的文本 |
| treeitem:prepend_text(text) | 在当前树节点文本的前面加上text |
| treeitem:append_text(text) | 在当前树节点文本的后面加上text |
还有注意一下网络字节序的问题,如果是网络字节序需要用add_le添加节点~ 添加节点举例
subtree:add(fields.dst_sock, tvb(offset, 4))实现协议里面添加子树例子
-- 子树其实也是一个节点,因此也需要在fields里面添加字段
fields.pack_type_tree = ProtoField.uint32(NAME .. ".pack_type_tree", "Packet Type", base.HEX)
-- 创建子树
pack_type_tree = subtree:add(fields.pack_type_tree, tvb(offset, 4))
pack_type_tree:add(fields.msg_type, tvb(offset, 2))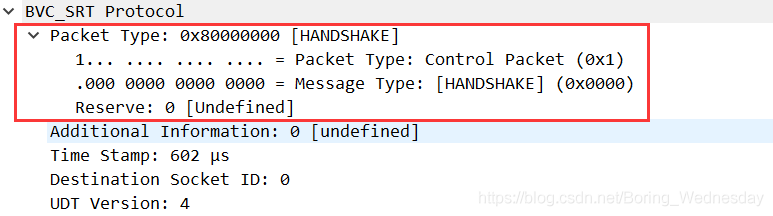
8. Fields
获得Wireshark已有协议字段。
| 接口 | 说明 |
|---|---|
| Field.new(fieldname) | 获得一个字段 |
| all_field_infos() | 获取当前packet的 field 信息 |
wireshark 本身已有大量的字段,比如我们想要获取 http2 的data 帧的内容,即可用 http2.data.data 获取。具体的fields 可以通过以下方式获得。
local t = Field.list()

for _, name in ipairs(t) do
    print(name)
end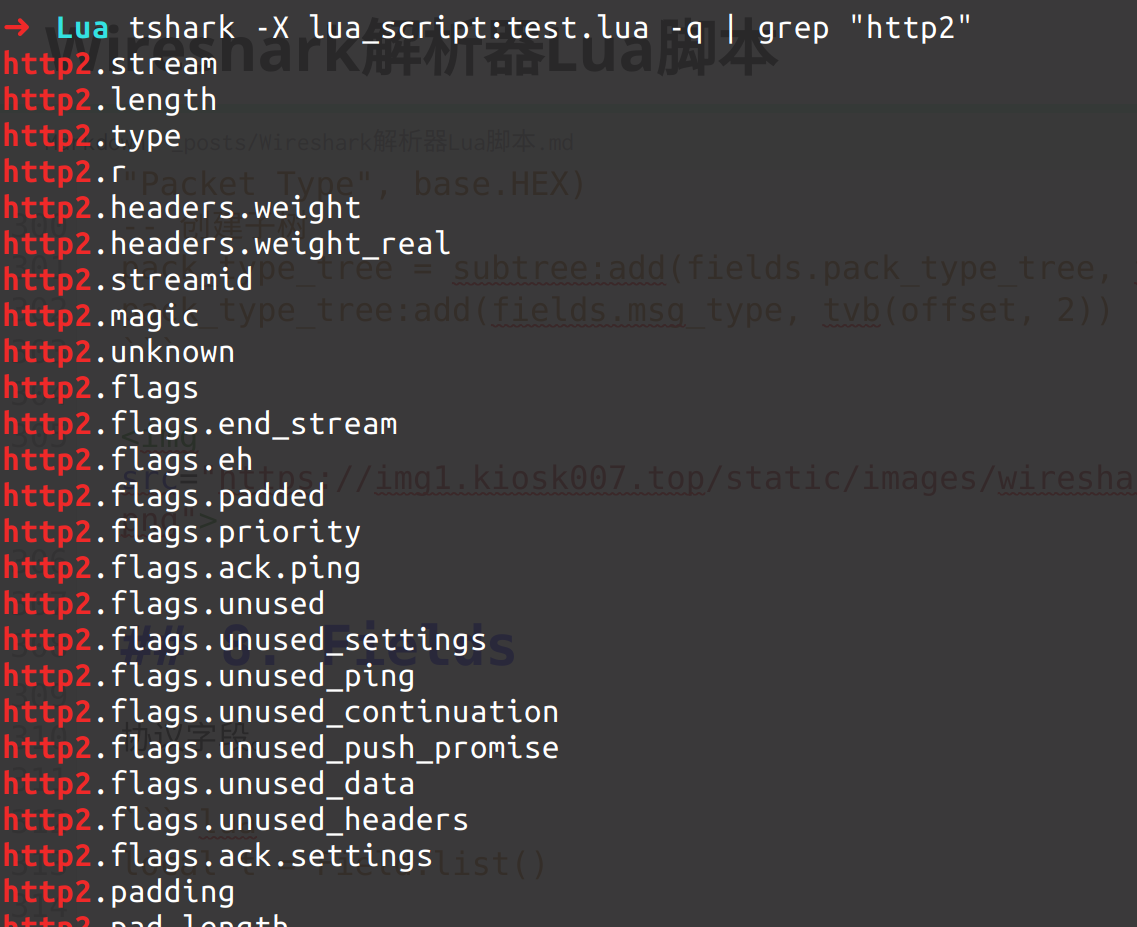
可以为tap定义一个回调函数packet,每当有http协议的报文时wireshark将调用这个函数,参数tvb是报文的二进制缓冲区。在该函数中调用Field变量可以取得分析好的字段,如果不存在返回nil。
我们要截获的http协议包就包括这几层协议Frame,IP,TCP,HTTP,data-text-lines(这个是http内容),这些上层协议的字段你都可以通过Field字段取得。 下面这一个截获框架,你可以使用tshark -X lua_script:tap.lua来执行这个例子
local tap = Listener.new("http")

local http = Field.new("http")
local host = Field.new("http.host")
local location = Field.new("http.location")
local dst_ip = Field.new("ip.dst")
local src_ip = Field.new("ip.src")
local dst_port = Field.new("tcp.dstport")
local src_port = Field.new("tcp.srcport")

local text = Field.new("data-text-lines")

function tap.packet(pinfo,tvb,tapinfo)
    --获取对应的字段
    local dst = dst_ip()
    local src = src_ip()
    local h = host()
    local dstp = dst_port()
    local srcp = src_port()
    --这里可以对截获的数据做存储打印等处理
    print(tostring(dst))
    print("host : "..tostring(h))
end

function tap.draw()
    print("draw called")
end

function tap.reset()
    print("reset called")
end
也可以调用 all_field_infos 获取当前 packet 中的信息,比如说以下这个 MQTT Over Websocket 的例子。
https://cloud.tencent.com/developer/article/1093536
创建 Lua 解析器
以下会的内容是搜集网上的一些优秀的介绍关于如何使用。
MongoDB dissector
以下的5篇文章是我从全网找到的最详尽的 lua 自定义协议解析脚本的教程。 从Lua基础到协议解析的全过程进行了阐述,从TCP Data 中解析 MongoDB 协议。
原文地址:
- Creating a Wireshark dissector in Lua - part 1 (the basics)
- Creating a Wireshark dissector in Lua - part 2 (debugging and a more advanced dissector)
- Creating a Wireshark dissector in Lua - part 3 (parsing the payload)
- Creating a Wireshark dissector in Lua - part 4 (separate subtrees)
- Creating a Wireshark dissector in Lua - part 5 (modularization)
Other
SRT协议的Wireshark解析器编写
该文章也详细介绍了如何使用wireshark解析一个自定义协议,本文的内容也有一些参考了本文章。 github 上的 srt-dev.lua 也是 比较全的例子。
原文地址:
wireshark 解析脚本示例:
解析Websocket上的MQTT协议
这篇文章被我单独列出的一个重要原因是,这个文章列举了如何实现,在已有协议之上的 payload 接着解析协议。比如本例中的在 websocket 的payload 之上解析 MQTT 协议。
原文地址:
github 地址: