gRPC Quick Start
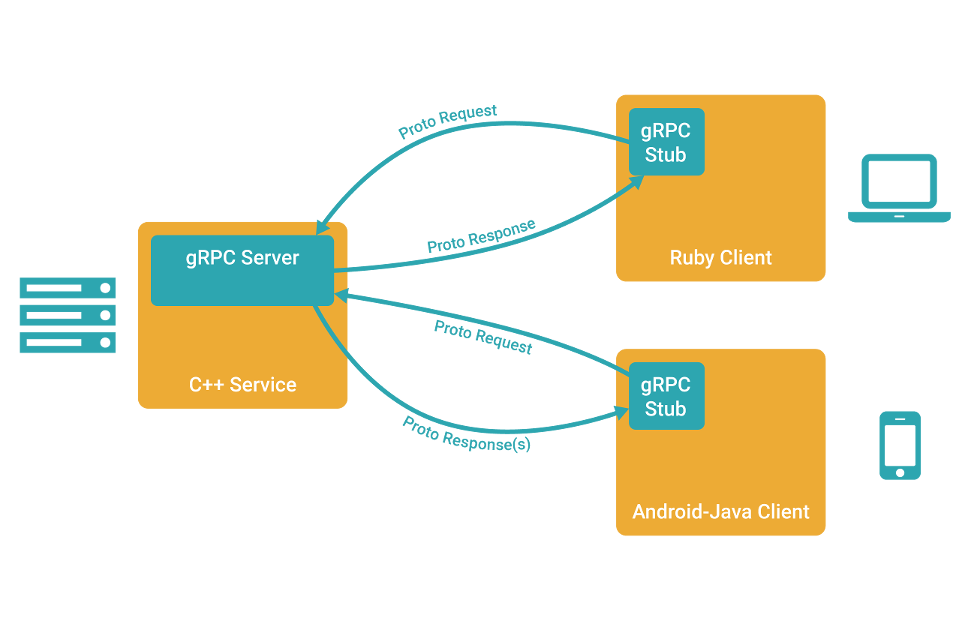
RPC 全称 (Remote Procedure Call),远程过程调用,指的是一台计算机通过网络请求另一台计算机的上服务,从而不需要了解底层网络细节,RPC 是构建在已经存在的协议(TCP/IP,HTTP 等)之上的。gRPC 是云原生计算基金会(CNCF)项目,gRPC 一开始由 google 开发,是一款语言中立、平台中立的服务间通信框架,使用 gRPC 可以使得客户端像调用本地方法一样,调用远程主机提供的服务。可以在任何地方运行,它使客户端和服务器应用程序能够透明地进行通信,并使构建连接系统变得更加容易。
Context
- gRPC 默认采用 protocol buffer 作为 IDL (Interface Description Lanage) 接口描述语言,服务之间通信的数据序列化和反序列化也是基于 protocol buffer 的,因为 protocol buffer 的特殊性,所以 gRPC 框架是跨语言的通信框架(与编程语言无关性)
- gRPC 是基于 http2 协议实现,多路复用支持通过同一连接发送多个并行请求,双向全双工通信,用于同时发送客户端请求和服务器响应,内置流式传输使请求和响应能够异步流式传输大数据集
- gRPC 并没有直接实现负载均衡和服务发现的功能,但是已经提供了自己的设计思路。已经为命名解析和负载均衡提供了接口。
service Greeter {
   /*
   以下 分别是 服务端 推送流, 客户端 推送流 ,双向流。
   */
  rpc GetStream (StreamReqData) returns (stream StreamResData){}
  rpc PutStream (stream StreamReqData) returns (StreamResData){}
  rpc AllStream (stream StreamReqData) returns (stream StreamResData){}
}
Protocal Buffer
Profile
Protocol buffers 是一个灵活的、高效的、自动化的用于对结构化数据进行序列化的协议,与XML相比,Protocol buffers序列化后的码流更小、速度更快、操作更简单。
序列化(serialization、marshalling)的过程是指将数据结构或者对象的状态转换成可以存储(比如文件、内存)或者传输的格式(比如网络)。反向操作就是反序列化(deserialization、unmarshalling)的过程。
- 二十世纪九十年代后期,XML开始流行,它是一种人类易读的基于文本的编码方式,易于阅读和理解,但是失去了紧凑的基于字节流的编码的优势。
- JSON是一种更轻量级的基于文本的编码方式,经常用在client/server端的通讯中。
- YAML类似JSON,新的特性更强大,更适合人类阅读,也更紧凑。
除了上面这些和Protobuf,还有许许多多的序列化格式,比如Thrift、Avro、BSON、CBOR、MessagePack, 还有很多非跨语言的编码格式。项目gosercomp对比了各种go的序列化库,包括序列化和反序列的性能,以及序列化后的数据大小。总体来说Protobuf序列化和反序列的性能都是比较高的,编码后的数据大小也不错。
如果你并不希望一定要在传输过程中消息数据可读,那么可以用 Protocal Buffer 来代替 Json 。
Demo
syntax = "proto3";      // 版本定义

message SearchRequest {
  int32  id = 1;
  string name = 2;
  bool   rich = 3;
}第一行指定protobuf的版本,这里是以proto3格式定义。
第三行 message 表示定义了一个结构体,在这个结构体里,最常见的类型有以下几种
- 数值型 ,如 double, float, int32, int64 …
- 布尔型,bool 只有True和False
- 字符型,string 表示任意字符,但是长度不可超过2的32次方
- 字节型,bytes表示任意的byte数组序列,但是长度也不可以超过2的32次方,比如可以用来传递一个图片。
- 枚举型,enum 表示枚举。可独立在 message 之外。可通过
option allow_alias = true;给枚举定义别名。 - 字典型,map类型需要设置键和值的类型。
- Well-Known类型, Protobuf也提供了定义,比如Timestamp和Duration。这些定义被放在
github.com/golang/protobuf/ptypes/。
引入其它proto文件
import  "other.proto";
import public "other2.proto";
import weak "other.proto";
比较少使用的是public和weak关键字。默认情况下weak引入的文件允许不存在(missing),只为了google内部使用。public具有传递性,如果你在文件中通过public引入第三方的proto文件,那么引入你这个文件同时也会引入第三方的proto。
关键字:
- option :option可以用在proto的scope中,或者message、enum、service的定义中。一般常用的就是定义某语言生成后的package名,最常见的用法,如
option go_package = "xxx"; - repeated : 指定某一个字段可以存放同一个类型的多个数据, 相当于golang里的slice。可采用
[packed=true]以实现更高 效的编码。repeated int32 samples = 4 [packed=true]; - reserved : 保护某字段或定义,如在message中指定 数字1 被保护,或变量名 person 被保护。一般用来保护废弃的数字定义。如
reserved 5; reserved "salary";如果再使用5 或者 salary 则会报错。
demo
syntax = "proto3";

package my.project;

import "google/protobuf/timestamp.proto";

option go_package = "pb";

message PersonMessage {
  int32   id = 1;
  bool    is_adult =2;
  string  name = 3;
  float   height = 4;
  float   weight = 5;
  bytes   avatar = 6;
  string  email = 7;
  bool    email_verified = 8;
  repeated string phone_numbers = 9;  // packed
  Gender  gender = 11;
  Date    birthday = 12;
  repeated Address addresses = 13;
  google.protobuf.Timestamp lastModified = 14;

  enum Gender {
    option allow_alias = true;
    Not_SPECIFIED = 0;
    MALE = 1;
    FEMALE = 2;
    MAN = 1;
    WOMAN = 2;
  }

  message Address {
    string province = 1;
    string city = 2;
    string zip_code = 3;
    string street = 4;
    string number = 5;
  }

  reserved 10, 20 to 100, 200 to max;
  reserved "foo","bar";
}


message Date {
  int32 year = 1;
  int32 month = 2;
  int32 day = 3;
}
Golang protocol buffer
定义 .proto 文件后,使用命令
protoc --protoc_path src/ -go_out=src/ src/person.proto 生成golang 文件
定义一个pb
func NewPersonMessage() *pb.PersonMessage {
	return &pb.PersonMessage{
		Id: 1,
		IsAdult: true,
		Name: "Kiosk",
		Height: 177,
		Weight: 140,
		Gender: pb.PersonMessage_MALE,
		PhoneNumbers: []string{"15660018902","17610010111"},
		Email: "kiosk007@foxmail.com",
	}
}
** 将 pb 写入文件 **
func writeToFile(filename string, pb proto.Message) error {
	dataBytes, err := proto.Marshal(pb)
	if err != nil { log.Fatalln("无法序列化") }
	if err := ioutil.WriteFile(filename, dataBytes, 0644); err != nil {
		log.Fatalln("无法写入文件")
	}

	log.Println("成功写入到文件")
	return nil
}

func main() {
	pm := NewPersonMessage()
	_ = writeToFile("person.bin",pm)
}
** 从文件读出 pb **
func readFromFile(filename string, pb proto.Message) error {
	dataBytes, err := ioutil.ReadFile(filename)
	if err != nil { log.Fatalln("读取文件错误",err.Error()) }
	if err := proto.Unmarshal(dataBytes, pb); err != nil {
		log.Fatalln("反序列化失败")
	}
	return nil
}

func main() {
	pm := &demo.PersonMessage{}
	_ = readFromFile("person.bin", pm)
	fmt.Println(pm)
}
pb 转 json && json 转 pb
func toJson(pb proto.Message) string {
	marshaler := jsonpb.Marshaler{Indent: "    "}

	str ,err := marshaler.MarshalToString(pb)
	if err != nil { log.Fatalln("转换为JSON时发生错误",err.Error()) }
	return str
}

func fromJson(in string, pb proto.Message) error {
	return jsonpb.UnmarshalString(in, pb)
}
gogo库
虽然官方库 golang/protobu 提供了对Protobuf的支持,但是使用最多还是第三方实现的库gogo/protobuf。
gogo库基于官方库开发,增加了很多的功能,包括:
- 快速的序列化和反序列化
- 更规范的Go数据结构
- goprotobuf兼容
- 可选择的产生一些辅助方法,减少使用中的代码输入
- 可以选择产生测试代码和benchmark代码
- 其它序列化格式
更多参考github: http://github.com/gogo/protobuf
gRPC Start
进入主题了, gRPC 是Google发布的基于HTTP 2.0传输层协议承载的高性能开源软件框架。提供了支持多种编程语言的、对网络设备进行配置和纳管的方法。
RPC是远程函数调用,因此每次调用的函数参数和返回值不能太大,否则将严重影响每次调用的响应时间。因此传统的RPC方法调用对于上传和下载较大数据量场景并不适合。同时传统RPC模式也不适用于对时间不确定的订阅和发布模式。为此,gRPC框架针对服务器端和客户端分别提供了流特性。 支持 服务端 推送流, 客户端 推送流 ,双向流。

install
gRPC要求 Go 版本 >= 1.6
- 安装grpc
$ go get -u -v google.golang.org/grpc- 安装 Protocol Buffers v3、protoc-gen-go:
$ go get -v -u github.com/golang/protobuf/protoc-gen-go- 生成grpc代码
$ protoc -I. --go_out=plugins=grpc:. helloworld.protodefine proto
gRPC需要事先定义proto文件,如下所示。定义完成后需要执行命令 protoc --go_out=plugins=grpc:. message.proto 生成相关的go语言代码。更多详细的操作参考官方例子 Quick start - gRPC
点击查看
gRPC server
gRPC服务的启动流程和标准库的RPC服务启动流程类似:
const port  = ":5001"

func main() {
	listen, err := net.Listen("tcp", port)
	if err != nil {  log.Fatalln(err.Error() }
	var options []grpc.ServerOption
	options = append(options, grpc.HeaderTableSize(2048))

	server := grpc.NewServer(options...)
	pb.RegisterEmployeeServiceServer(server, new(example.EmployeeService))
	log.Printf("gRPC Server started ...\n Listen on port %s", port)

	_ = server.Serve(listen)
}- 这里设置监听在 tcp 的 5001 端口.
grpc.ServerOption可以设置gRPC的服务端监听参数, 这里我仅设置了 H2 的 header 动态表大小。除此之外,如设置 TLS证书载入:grpc.Creds(c credentials.TransportCredentials)。 最大并发数、收发最大消息Size等等,详见 https://godoc.org/google.golang.org/grpc#ServerOptionpb.RegisterEmployeeServiceServer是proto生成的 message.pb.go 提供的服务端注册方法。example.EmployeeService是我们后面手动创建的空结构,后面的函数方法都需要基于这个空结构实现。- server.Serve 将监听套接字传入。
实现 EmployeeService
service EmployeeService {
  rpc GetByNo(GetByNoRequest) returns (EmployeeResponse);         // 一元请求
  rpc GetAll(GetAllRequest) returns (stream EmployeeResponse);    // 客户端推送流
  rpc AddPhoto(stream AddPhotoRequest) returns (AddPhotoResponse); // 服务端推送流
  rpc SaveAll(stream EmployeeRequest) returns (stream EmployeeResponse); // 双向流
}

对应的pb生成代码
// EmployeeServiceServer is the server API for EmployeeService service.
type EmployeeServiceServer interface {
	GetByNo(context.Context, *GetByNoRequest) (*EmployeeResponse, error)
	GetAll(*GetAllRequest, EmployeeService_GetAllServer) error
	AddPhoto(EmployeeService_AddPhotoServer) error
	SaveAll(EmployeeService_SaveAllServer) error
}
首先需要定义 type EmployeeService struct {} 后面的所有方法都需要基于这个实现,这个也是服务端注册的参数。
- **一元请求
GetByNo()**
func (s *EmployeeService) GetByNo(ctx context.Context, request *pb.GetByNoRequest) (*pb.EmployeeResponse, error) {
	log.Println(request.No)
	for _,e := range employees {
		if request.No == e.No {
			return &pb.EmployeeResponse{
				Employee:           &e,
			}, nil
		}
	}
	return nil, errors.New("the employee does not exist")
}
请求参数是 GetByNoRequest, 通过上面的pb定义得知,这个message是有一个No参数。所以可以取出来当请求参数。返回的参数是EmployeeResponse,通过pb定义得知,其返回参数是 Employee 对象。
- 服务端返回流
GetAll()
func (s *EmployeeService) GetAll(request *pb.GetAllRequest, stream pb.EmployeeService_GetAllServer) error {
	for _,e := range employees {
		err := stream.Send(&pb.EmployeeResponse{
			Employee: &e,
		})
		if err != nil {
			log.Println(err.Error())
		}
	}
	return nil
}
注意,返回的参数是一条流,其流发送的方法也可以使用Send函数,这里是一个循环,将employee对象循环写入这条流中。
type EmployeeService_GetAllServer interface {
	Send(*EmployeeResponse) error
	grpc.ServerStream
}- 客户端推送流
AddPhoto()
func (s *EmployeeService) AddPhoto(stream pb.EmployeeService_AddPhotoServer) error {
	md, ok := metadata.FromIncomingContext(stream.Context())
	if ok { fmt.Printf("employee: %s", md["no"][0]) }
	var images []byte
	for {
		data, err := stream.Recv()
		if err == io.EOF {
			fmt.Printf("File Size %d\n", len(images))
			return stream.SendAndClose(&pb.AddPhotoResponse{IsOk: true})
		}
		if err != nil {
			return err
		}
		fmt.Printf("File received: %d\n", len(data.Data))
		images = append(images, data.Data...)
	}
}
这个函数实现了客户端将一张图片拆分成 bytes 再一点一点发送给服务端的demo。读到EOF表示成功读完。Data正是在 pb 里定义的AddPhotoRequest的客户端请求内容。
- 双向流
SaveAll()
func (s *EmployeeService) SaveAll(stream pb.EmployeeService_SaveAllServer) error {
	for {
		empReq, err := stream.Recv()
		if err == io.EOF {
			break
		}else if err != nil {
			return err
		}
		employees = append(employees, *empReq.Employee)
		time.Sleep(1000 * time.Microsecond)
		_ = stream.Send(&pb.EmployeeResponse{Employee: empReq.Employee})
	}
	for _ , emp := range employees {
		fmt.Println(emp)
	}
	return nil
}
在这个方法中,服务端每读一份数据,休眠100ms,再将读入的数据原封不动的返回给客户端。
gRPC client
func main() {
	var options []grpc.DialOption
	options = append(options, grpc.WithInsecure())

	conn, err := grpc.Dial("localhost" + port, options...)
	if err != nil {
		log.Fatalln("can't dial server " + err.Error())
	}
	defer conn.Close()
	client := pb.NewEmployeeServiceClient(conn)
	// GetByNo(client)
	// getAll(client)
	//addPhoto(client)
	saveAll(client)
}客户端也有一个类似Server端的grpc.DialOption, 这里因为服务端没有使用证书,所以客户端必须添加 WithInsecure 选项。调用 pb.NewEmployeeServiceClient(conn) 会返回一个 Client employeeServiceClient。
type employeeServiceClient struct {
	cc grpc.ClientConnInterface
}
这个client拥有之前定义的客户端可调用的 RPC 方法。如下:
// For semantics around ctx use and closing/ending streaming RPCs, please refer to https://godoc.org/google.golang.org/grpc#ClientConn.NewStream.
type EmployeeServiceClient interface {
	GetByNo(ctx context.Context, in *GetByNoRequest, opts ...grpc.CallOption) (*EmployeeResponse, error)
	GetAll(ctx context.Context, in *GetAllRequest, opts ...grpc.CallOption) (EmployeeService_GetAllClient, error)
	AddPhoto(ctx context.Context, opts ...grpc.CallOption) (EmployeeService_AddPhotoClient, error)
	SaveAll(ctx context.Context, opts ...grpc.CallOption) (EmployeeService_SaveAllClient, error)
}
实现 Client 调用
- 一元请求
GetByNo()
func GetByNo(client pb.EmployeeServiceClient) {
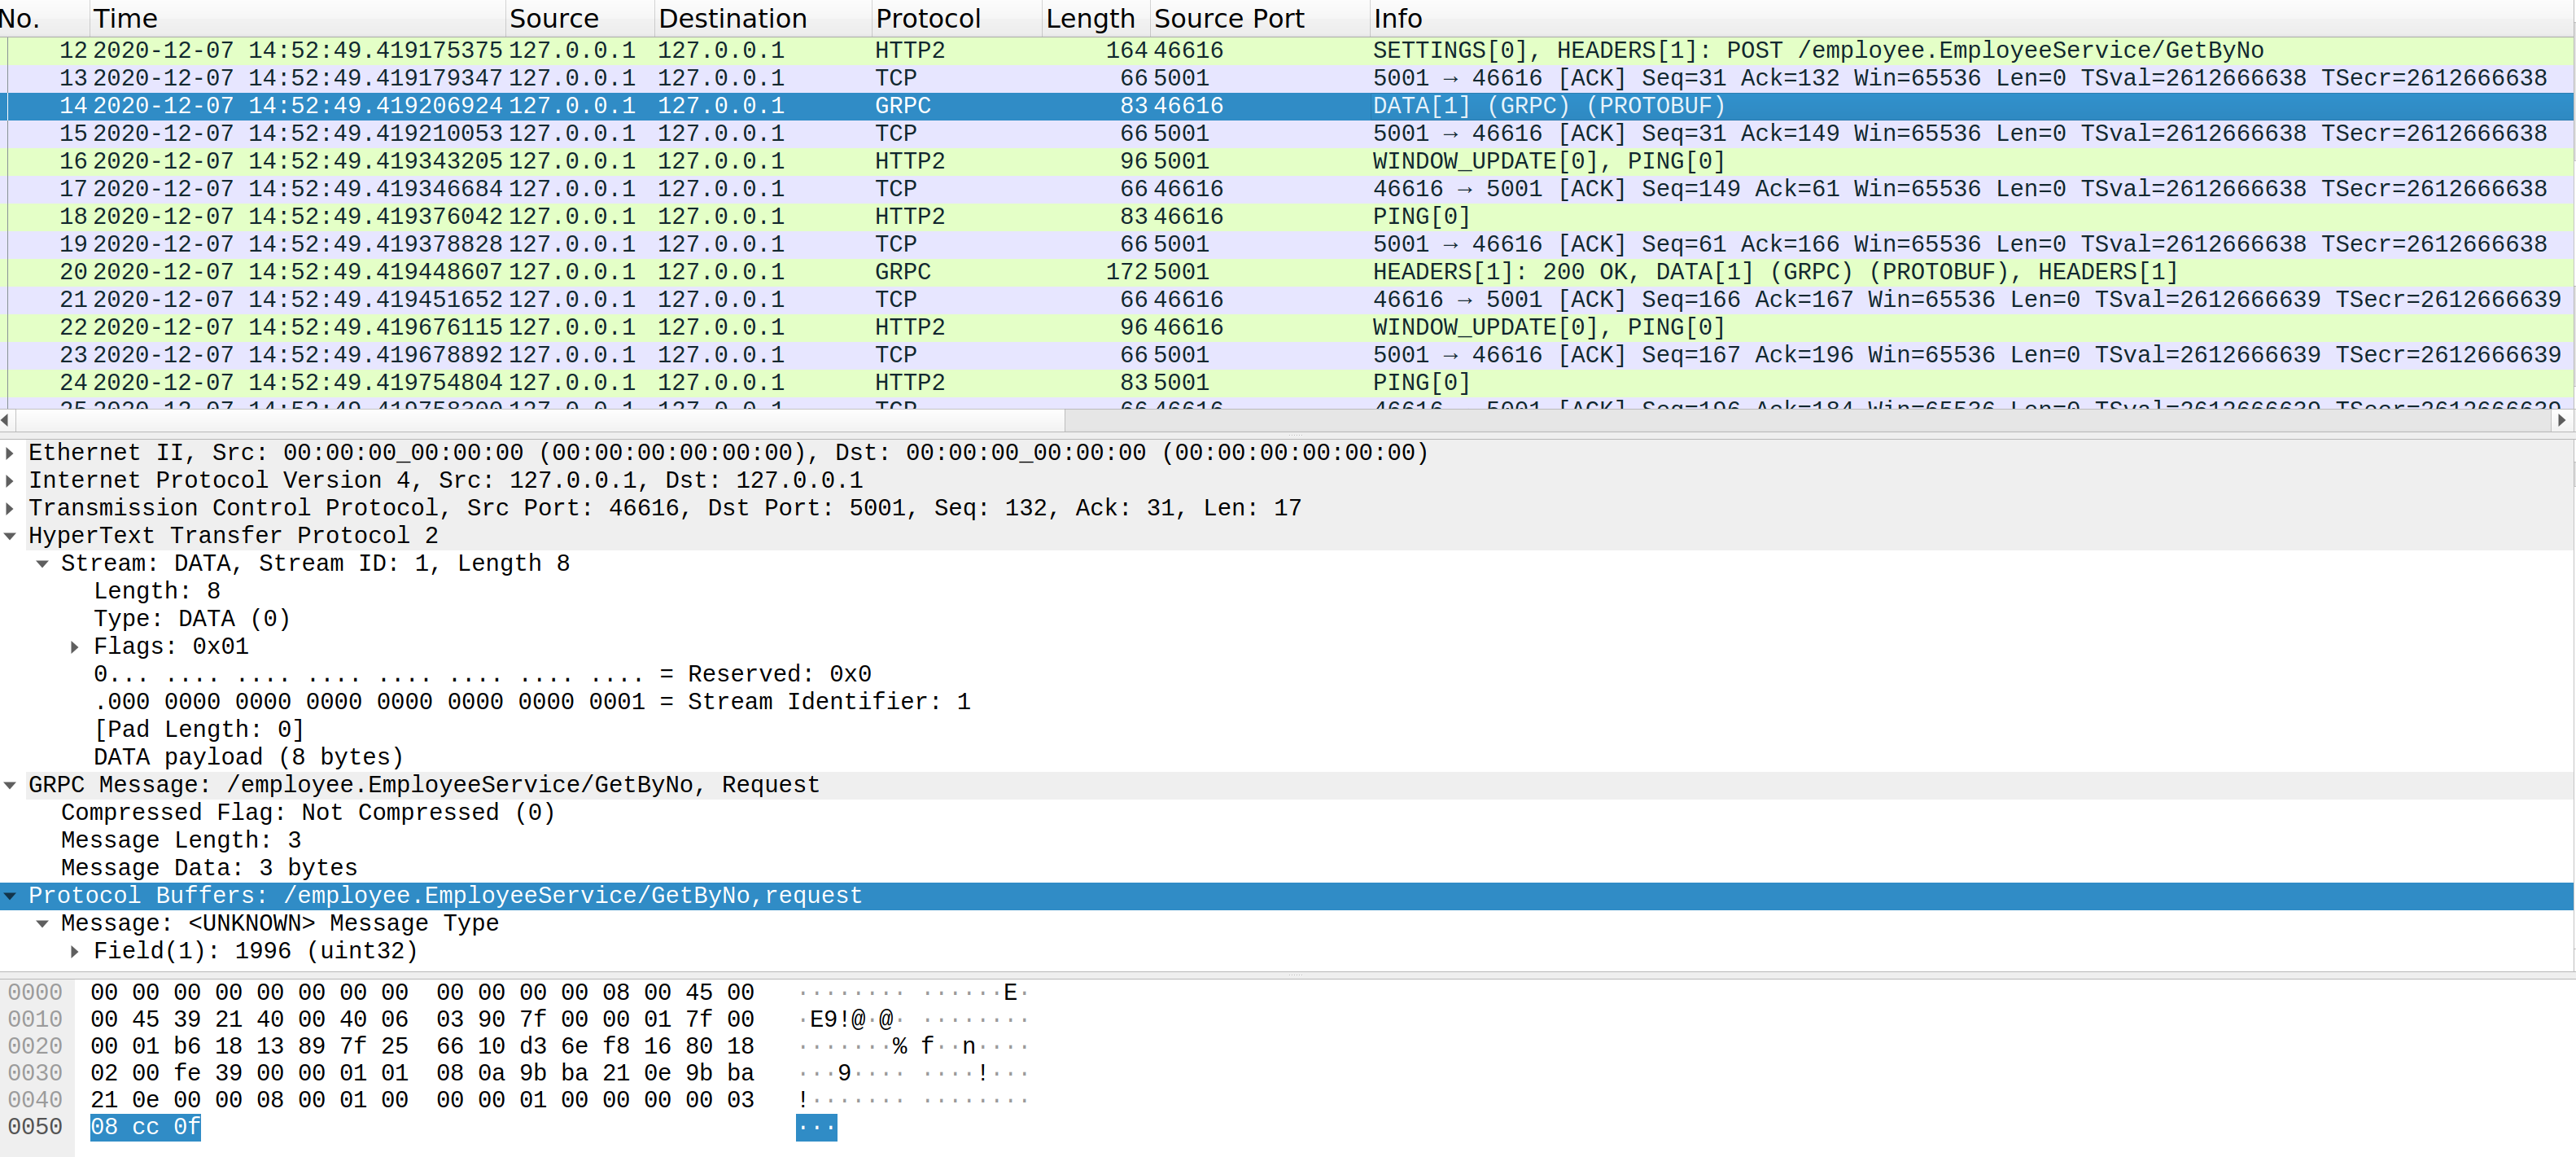
	res, err := client.GetByNo(context.Background(), &pb.GetByNoRequest{No: 1996})
	if err != nil {
		log.Fatalln(err.Error())
	}
	fmt.Println(res.Employee)
}
传入的参数拥有 GetByNo() 这个方法,直接调用即可。
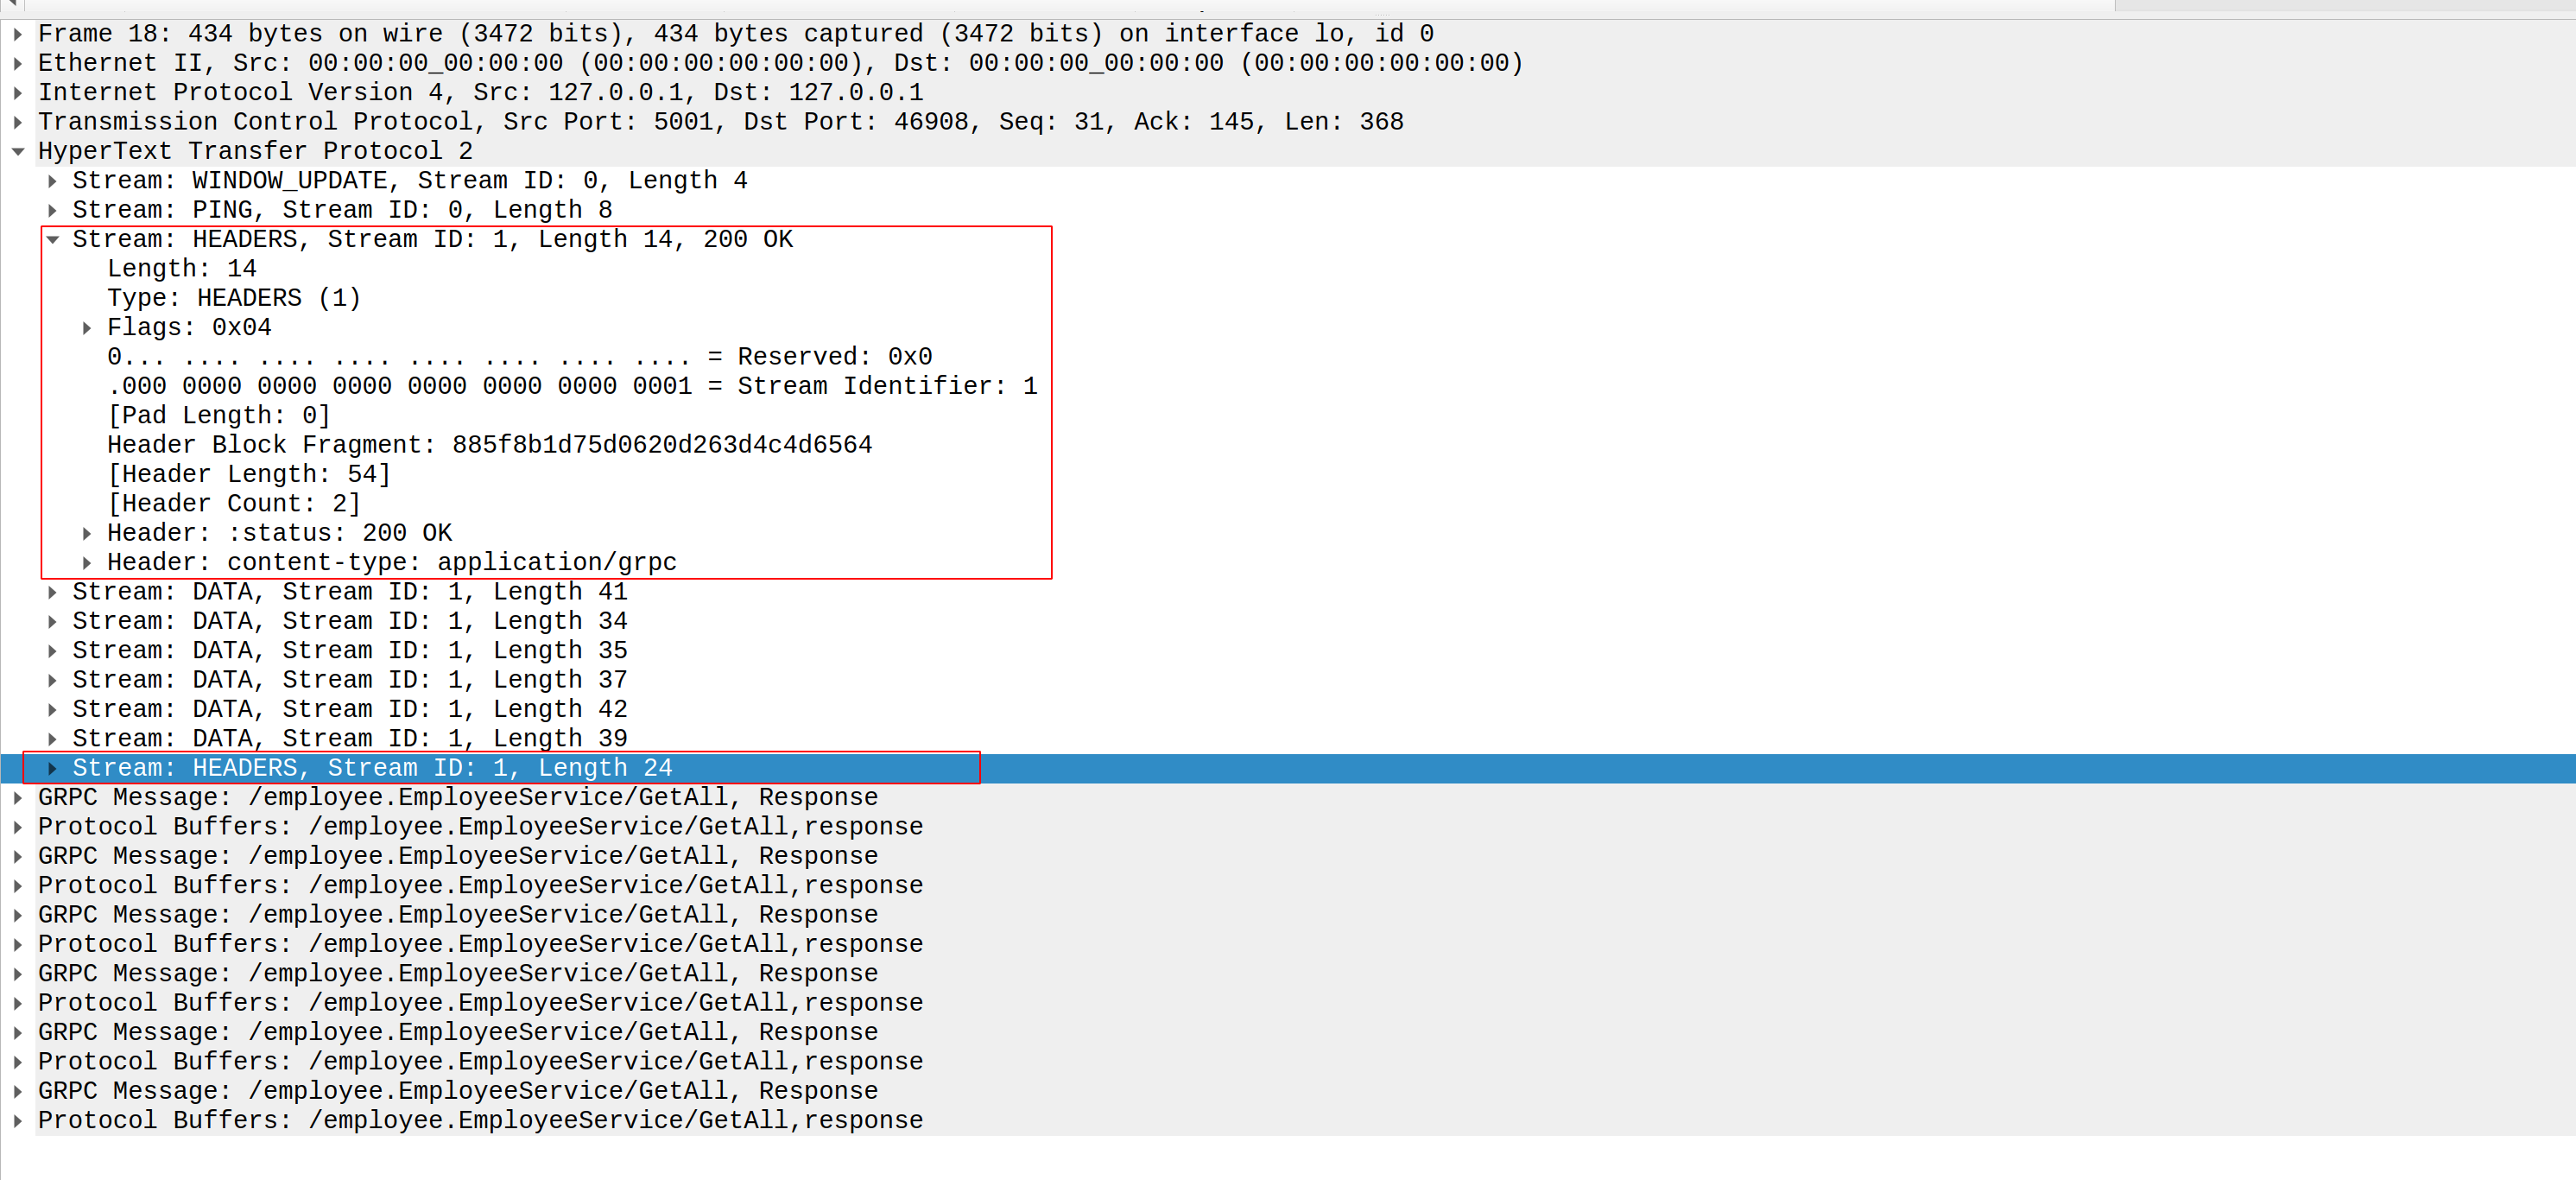
抓包可以看到,整个gRPC的调用过程是基于HTTP2的, 本质是发起了一个H2的POST请求, 和传统H2不同的是,response 的 Header帧有2个,结尾处还有一个。第2个表示调用结束。
Stream: HEADERS, Stream ID: 1, Length 80, POST /employee.EmployeeService/GetByNo
    Length: 80
    Type: HEADERS (1)
    Flags: 0x04
    0... .... .... .... .... .... .... .... = Reserved: 0x0
    .000 0000 0000 0000 0000 0000 0000 0001 = Stream Identifier: 1
    [Pad Length: 0]
    Header Block Fragment: 3fe10f8386459960b4d741fd14abe0a6ba0fe8a5dc5b3b98…
    [Header Length: 202]
    [Header Count: 8]
    Header table size update
    Header: :method: POST
    Header: :scheme: http
    Header: :path: /employee.EmployeeService/GetByNo
    Header: :authority: localhost:5001
    Header: content-type: application/grpc
    Header: user-agent: grpc-go/1.33.2
    Header: te: trailers
- 服务端返回流
GetAll()
func getAll(client pb.EmployeeServiceClient) {
	stream, err := client.GetAll(context.Background(), &pb.GetAllRequest{})
	if err != nil {
		log.Fatalln(err.Error())
	}
	for {
		res, err := stream.Recv()
		if err == io.EOF {
			return
		}else if err != nil {
			log.Fatalln(err.Error())
		}
		fmt.Println(res.Employee)
	}
}
服务端返回的流可以使用 stream.Recv() 循环接收。

- 客户端推送流
AddPhoto()
func addPhoto(client pb.EmployeeServiceClient) {
	imgFile,err := os.Open("/home/kiosk007/Pictures/2020-09-22_00-15.png")
	if err != nil {
		log.Fatalln(err.Error())
	}
	defer imgFile.Close()

	md := metadata.New(map[string]string{"no": "1996"})
	context := context.Background()
	context = metadata.NewOutgoingContext(context, md)
	stream,err := client.AddPhoto(context)
	if err != nil {
		log.Fatalln(err.Error())
	}
	for {
		chunk := make([]byte, 128*24)
		chunkSize,err := imgFile.Read(chunk)
		if err == io.EOF {
			break
		}
		if err != nil {
			log.Fatalln(err.Error())
		}
		if chunkSize < len(chunk) {
			chunk = chunk[:chunkSize]
		}
		_ = stream.Send(&pb.AddPhotoRequest{Data: chunk})
	}
	res, err := stream.CloseAndRecv()
	if err != nil {
		log.Fatalln(err.Error())
	}
	fmt.Println(res.IsOk)
}
客户端推送流实现了一个照片流式上传的功能。每次发送 3072字节 (128*24)。
- 双向流
SaveAll()
func saveAll(client pb.EmployeeServiceClient) {
employees := []pb.Employee{
pb.Employee{
Id: 300,
No: 5001,
FirstName: "Monica",
LastName: "Geller",
MonthSalary: 15500,
Status: pb.EmployeeStatus_RETIRED,
LastModified: ×tamp.Timestamp{ Seconds: time.Now().Unix() },
},
pb.Employee{
Id: 301,
No: 5002,
FirstName: "Joey",
LastName: "Green",
MonthSalary: 200,
Status: pb.EmployeeStatus_RESIGNED,
LastModified: ×tamp.Timestamp{ Seconds: time.Now().Unix() },
},
}
stream, err := client.SaveAll(context.Background())
if err != nil {
log.Fatalln(err.Error())
}
finishChannel := make(chan struct{})
go func() {
for {
res,err := stream.Recv()
if err == io.EOF {
finishChannel <- struct{}{}
break
}else if err != nil {
log.Fatalln(err.Error())
}
fmt.Println(res.Employee)
}
}()
for _,e := range employees {
err := stream.Send(&pb.EmployeeRequest{Employee: &e})
time.Sleep(500 * time.Microsecond)
if err != nil {
log.Fatalln(err.Error())
}
}
_ = stream.CloseSend()
<- finishChannel
}参考: