curl 命令小结
curl 命令是我日常工作中最常用的命令之一,所以很有必要总结一下curl命令的一些用法。如统计耗时、以指定的ip访问某个域名。添加携带某些Header等。curl命令绝对是日常debug之神。

- curl 官网:https://curl.se
- curl 支持: DICT, FILE, FTP, FTPS, GOPHER, GOPHERS, HTTP, HTTPS, IMAP, IMAPS, LDAP, LDAPS, MQTT, POP3, POP3S, RTMP, RTMPS, RTSP, SCP, SFTP, SMB, SMBS, SMTP, SMTPS, TELNET and TFTP. curl supports SSL certificates, HTTP POST, HTTP PUT, FTP uploading, HTTP form based upload, proxies, HTTP/2, HTTP/3, cookies, user+password authentication (Basic, Plain, Digest, CRAM-MD5, SCRAM-SHA, NTLM, Negotiate and Kerberos), file transfer resume, proxy tunneling and more.
基本用法
- 指定解析:
curl https://github.com --resolve github.com:443:13.229.188.59 -v -o /dev/null- POST请求携带json数据
curl -H "Content-Type: application/json" -X POST -d '{"abc":123,"bcd":"nihao"}' URL- 修改请求头
curl -H "host: www.baidu.com" https://127.0.0.1- 限速
限制curl使用的最大带宽;如果未指定单位,默认单位为“bytes/秒”,你也可以指定单位为“K”、“M”、“G”等单位,如:“–limit-rate 1m”为限制最大使用带宽为“1m字节/秒”;
curl https://www.baidu.com --limit-rate 10k- 下载
显示进度条(option:-#)或不显示进度条(option:-s)
curl -# -O https://img1.kiosk007.top/static/images/network/curl/curl-command.png高级用法
curl 命令提供了 -w 参数,这个参数在 manpage 是这样解释的:
-w, --write-out <format>
              Make curl display information on stdout after a completed transfer. The format is a string that may contain plain text mixed with any number of variables. The
              format can be specified as a literal "string", or you can have curl read the format from a file with "@filename" and to tell curl  to  read  the  format  from
              stdin you write "@-".

              The  variables  present in the output format will be substituted by the value or text that curl thinks fit, as described below. All variables are specified as
              %{variable_name} and to output a normal % you just write them as %%. You can output a newline by using \n, a carriage return with \r and a tab space with \t.

              The output will be written to standard output, but this can be switched to standard error by using %{stderr}.

              NOTE: The %-symbol is a special symbol in the win32-environment, where all occurrences of % must be doubled when using this option.
它能够按照指定的格式打印某些信息,里面可以使用某些特定的变量,而且支持 \n、\t和 \r 转义字符。提供的变量很多,比如 status_code、local_port、size_download 等等,这篇文章我们只关注和请求时间有关的变量(以 time_ 开头的变量)。
具体支持的变量如下
% content_type   The Content-Type of the requested document, if there was any.

% filename_effective   The ultimate filename that curl writes out to. This is only meaningful if curl is told to write to a file with the  -O,  --remote-name  or  -o, --output option. It's most useful in combination with the -J, --remote-header-name option. (Added in 7.26.0)'

% ftp_entry_path The initial path curl ended up in when logging on to the remote FTP server. (Added in 7.15.4)

% http_code      The  numerical  response  code  that was found in the last retrieved HTTP(S) or FTP(s) transfer. In 7.18.2 the alias response_code was added to show the same info.

% http_connect   The numerical code that was found in the last response (from a proxy) to a curl CONNECT request. (Added in 7.12.4)

% http_version   The http version that was effectively used. (Added in 7.50.0)

% local_ip       The IP address of the local end of the most recently done connection - can be either IPv4 or IPv6 (Added in 7.29.0)

% local_port     The local port number of the most recently done connection (Added in 7.29.0)

% num_connects   Number of new connects made in the recent transfer. (Added in 7.12.3)

% num_redirects  Number of redirects that were followed in the request. (Added in 7.12.3)

% proxy_ssl_verify_result   The result of the HTTPS proxy's SSL peer certificate verification that was requested. 0  means  the  verification  was  successful.  (Added  in 7.52.0)'

% redirect_url   When an HTTP request was made without -L, --location to follow redirects (or when --max-redir is met), this variable will show the actual URL a redirect would have gone to. (Added in 7.18.2)

% remote_ip      The remote IP address of the most recently done connection - can be either IPv4 or IPv6 (Added in 7.29.0)

% remote_port    The remote port number of the most recently done connection (Added in 7.29.0)
先往文本文件 curl-format.txt 写入下面的内容:
➜  ~ cat curl-format.txt
time_namelookup:  %{time_namelookup}\n
time_connect:  %{time_connect}\n
time_appconnect:  %{time_appconnect}\n
time_pretransfer:  %{time_pretransfer}\n
time_redirect:  %{time_redirect}\n
time_starttransfer:  %{time_starttransfer}\n
----------\n
time_total:  %{time_total}\n
http_code:  %{http_code}\n
----------\n
local_ip:  %{local_ip}\n
size_download:  %{size_download}\n
size_header:  %{size_header}\n
size_request:  %{size_request}\n
size_upload:  %{size_upload}\n
speed_download:  %{speed_download}\n
speed_upload: %{speed_upload}\n- ime_namelookup:DNS 域名解析的时候,就是把 https://zhihu.com 转换成 ip 地址的过程
- time_connect:TCP 连接建立的时间,就是三次握手的时间
- time_appconnect:SSL/SSH 等上层协议建立连接的时间,比如 connect/handshake 的时间
- time_redirect:从开始到最后一个请求事务的时间
- time_pretransfer:从请求开始到响应开始传输的时间
- time_starttransfer:从请求开始到第一个字节将要传输的时间
- time_total:这次请求花费的全部时间
% curl -w"@curl-format.txt" -o /dev/null -s -L https://kiosk007.top/
time_namelookup:  0.011032
time_connect:  0.103585
time_appconnect:  0.235695
time_pretransfer:  0.235911
time_redirect:  0.000000
time_starttransfer:  0.375289
----------
time_total:  0.657439
http_code:  200
----------
local_ip:  192.168.0.112
size_download:  18180
size_header:  661
size_request:  74
size_upload:  0
speed_download:  27671.000
speed_upload:  0.000
HTTP3 新特性
https://curl.se/docs/http3.html
curl 可以基于 quiche 实现HTTP3 的能力,当前H3的草案还没有完全定稿,所以curl 的quic不一定能够访问成功所有的QUIC服务端实现。
通过以下方式编译支持H3特性的curl
Build quiche and BoringSSL:
% git clone --recursive https://github.com/cloudflare/quiche
 % cd quiche
 % cargo build --release --features ffi,pkg-config-meta,qlog
 % mkdir deps/boringssl/src/lib
 % ln -vnf $(find target/release -name libcrypto.a -o -name libssl.a) deps/boringssl/src/lib/
Build curl:
% cd ..
 % git clone https://github.com/curl/curl
 % cd curl
 % ./buildconf
 % ./configure LDFLAGS="-Wl,-rpath,$PWD/../quiche/target/release" --with-openssl=$PWD/../quiche/deps/boringssl/src --with-quiche=$PWD/../quiche/target/release
 % make
Use HTTP/3 directly:
curl --http3 https://nghttp2.org:4433/
Upgrade via Alt-Svc:
curl --alt-svc altsvc.cache https://quic.aiortc.org/
See this list of public HTTP/3 servers
ECH
不久前CloudFlare正式为CDN全面启用了ECH(Encrypted Client Hello)功能,搭配DoH可以实现加密真实的SNI(Server Name Indication),而明文显示Public Name。如经过CloudFlare CDN 并启用ECH后,明文SNI为cloudflare-ech.com
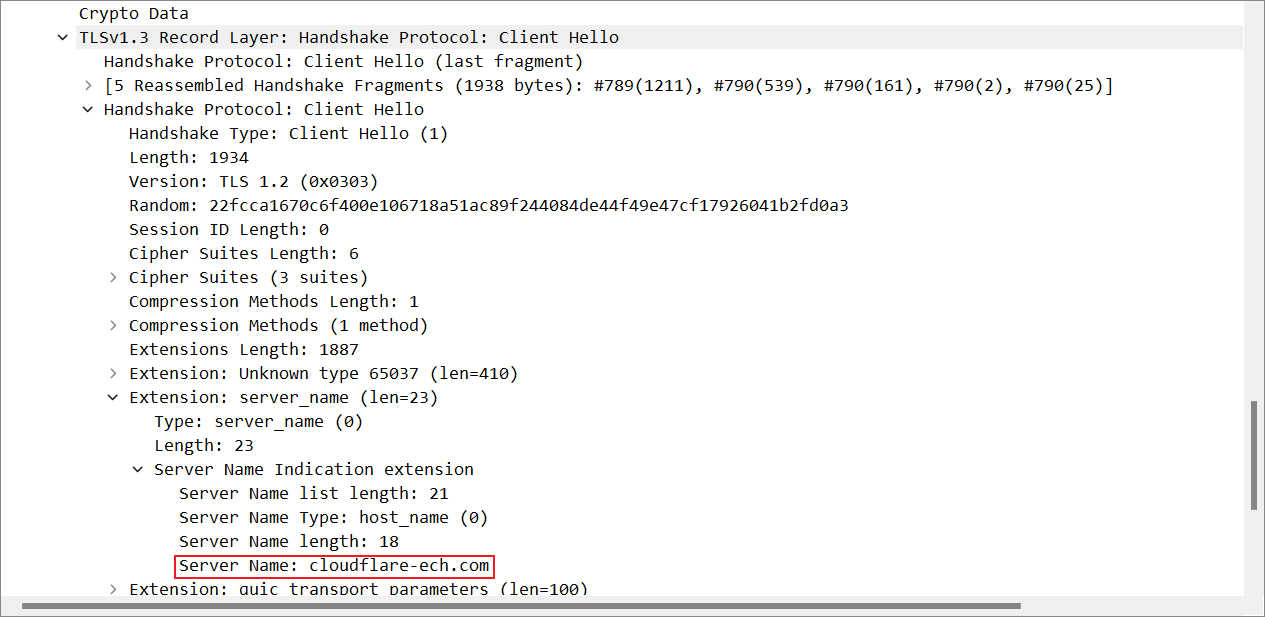
加密后的真实SNI至少在客户端和CloudFlare CDN之间是无法被第三方获知的,从而提供更强的隐私保障,并且由于不显示真实的SNI,根据SNI进行阻断连接的方法更加受到限制,除非将所有SNI为cloudflare-ech.com的连接一同阻断。
我们可以使用 Curl 作为测试ECH和HTTP/3连接的工具,目前这些功能依然还处于测试过程中,并且实现了HTTP/3的ssl库非常多(如openssl/openssl, quictls/openssl, cloudflare/quiche等,官方编译指南),但是貌似只有cloudflare/quiche同时支持ECH和HTTP/3。
sudo apt install git net-tools cmake build-essential libssl-dev zlib1g-dev libbrotli-dev libzstd-dev autoconf automake libtool libpsl-dev libnghttp2-dev pkg-config
curl --proto '=https' --tlsv1.2 -sSf https://sh.rustup.rs | sh
. "$HOME/.cargo/env"
git clone --recursive -b 0.22.0 https://github.com/cloudflare/quiche
git clone https://github.com/curl/curl
cd quiche
cargo build --package quiche --release --features ffi,pkg-config-meta,qlog
ln -s libquiche.so target/release/libquiche.so.0
mkdir quiche/deps/boringssl/src/lib
ln -vnf $(find target/release -name libcrypto.a -o -name libssl.a) quiche/deps/boringssl/src/lib/
cd ../curl
autoreconf -fi
./configure LDFLAGS="-Wl,-rpath,$PWD/../quiche/target/release" --with-openssl=$PWD/../quiche/quiche/deps/boringssl/src --with-quiche=$PWD/../quiche/target/release --enable-ech --with-zlib --with-brotli --with-zstd --enable-versioned-symbols
make
执行命令验证:
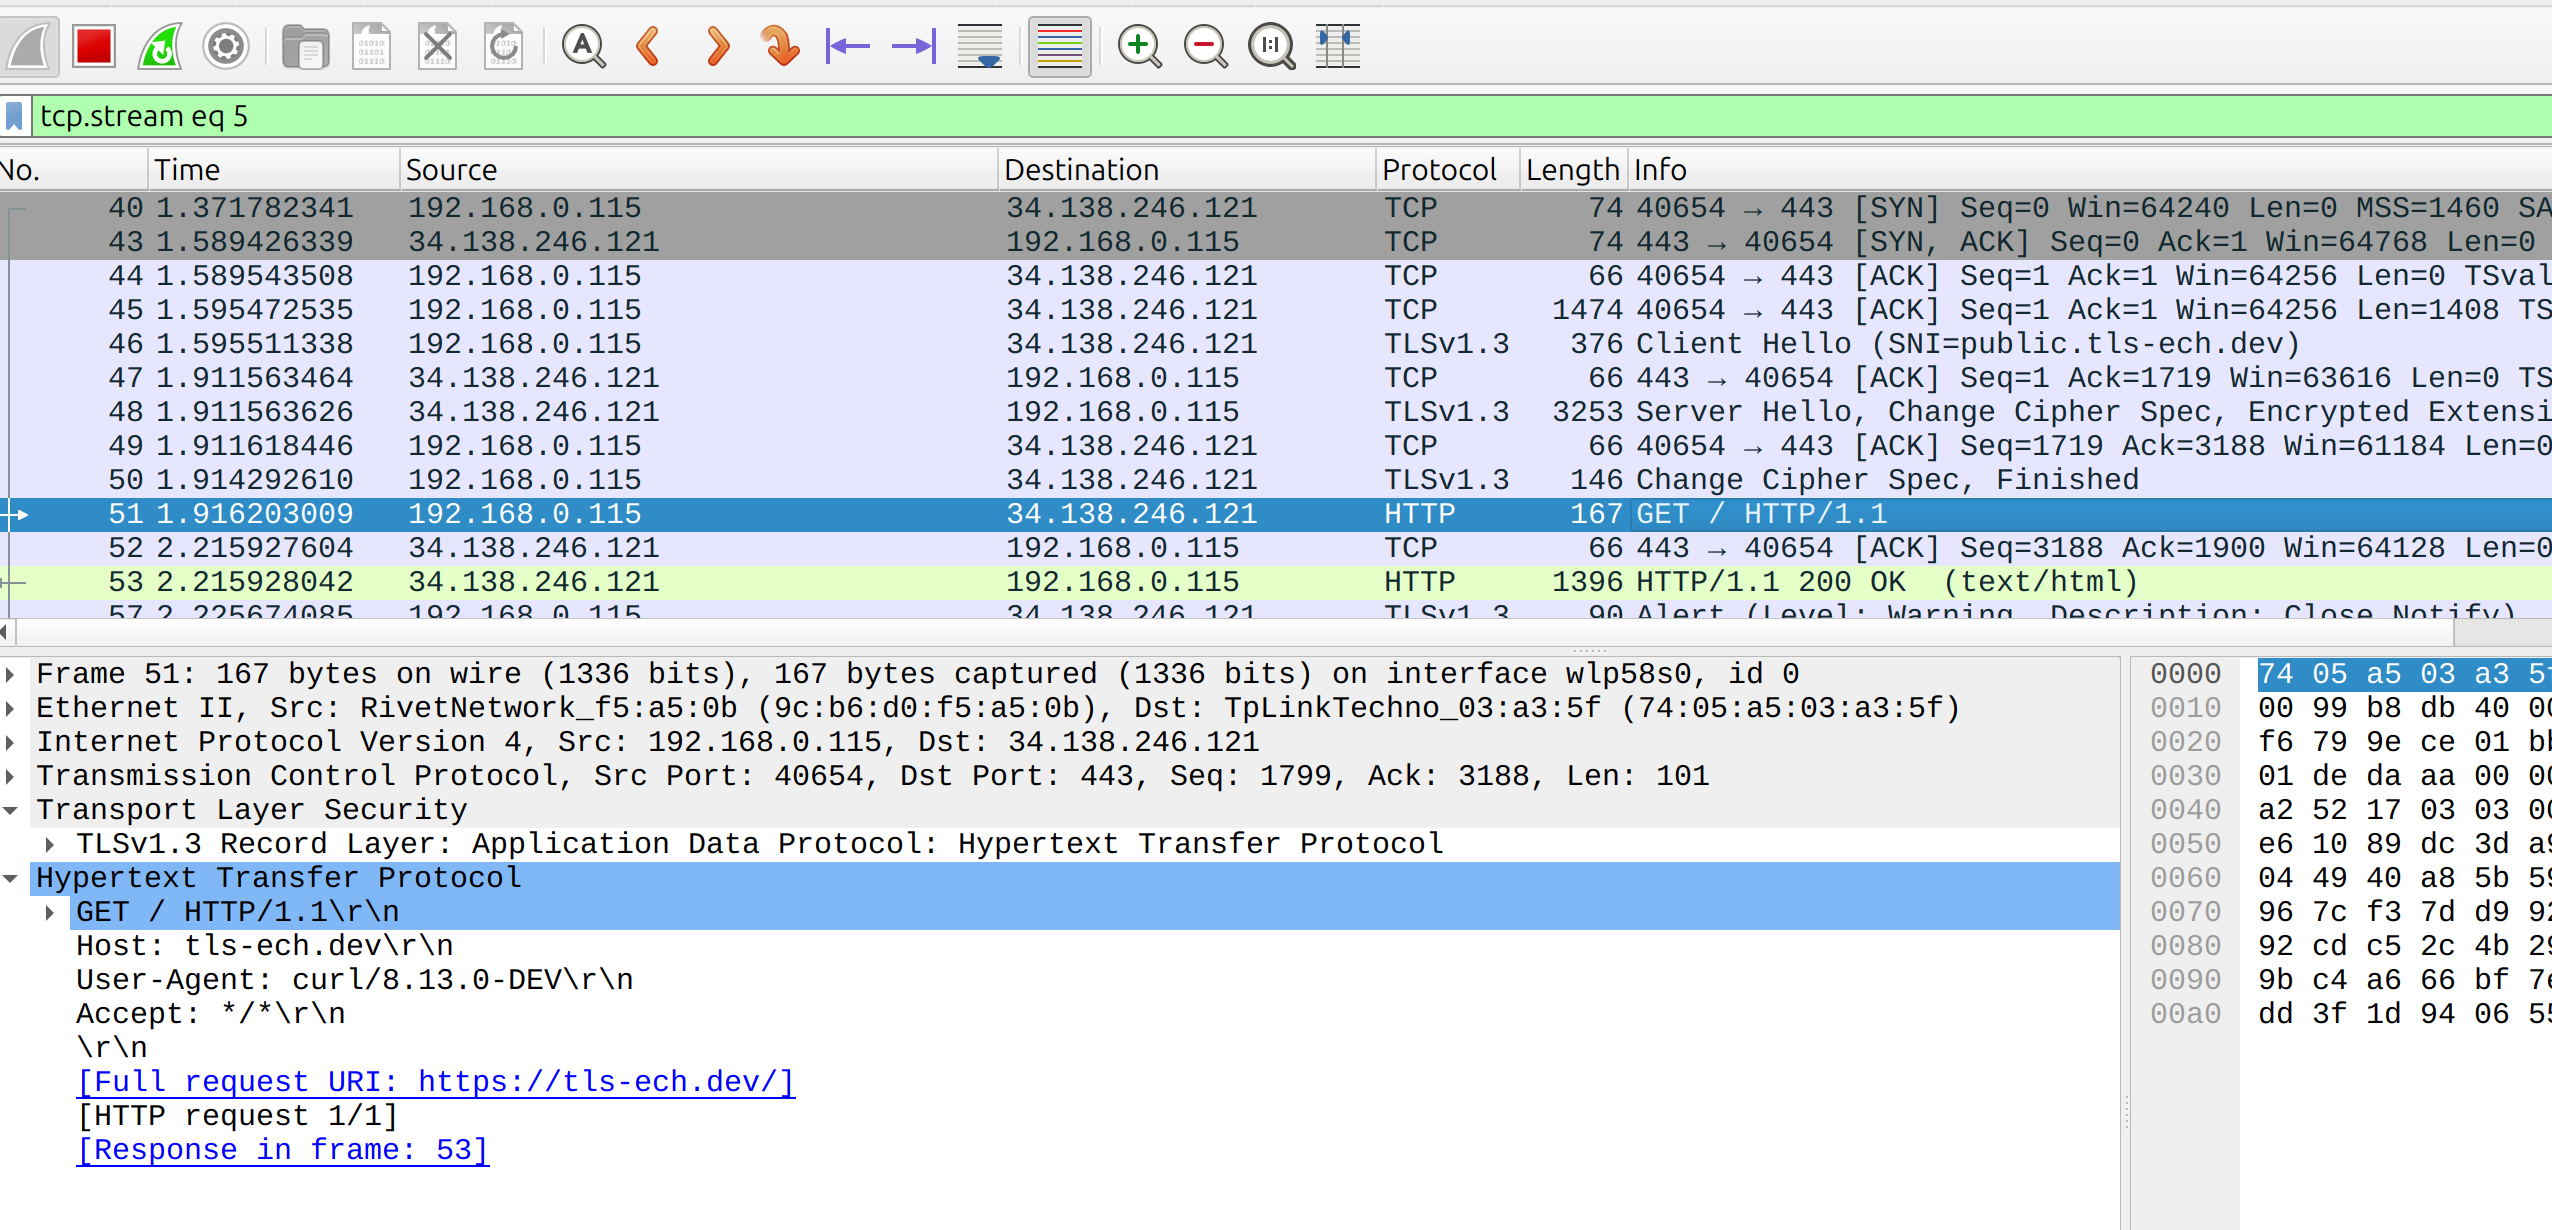
curl --http2 --ech true --doh-url https://dot.pub/dns-query https://tls-ech.dev -vv -o /dev/null下面可以看到 TLS 的 client hello 上显示的是 public.tls-ech.dev, 但是下面实际通信的 Host 是 tls-ech.dev
编译的相关的文章链接:https://kabe.dev/%E7%BC%96%E8%AF%91curl/