在前面的 文章 中认识了 OpenStack ,这篇文章会实际搭建一个 OpenStack 服务来更好的认识 OpenStack。OpenStack 本身能被定义为云操作系统,本身是比较复杂的,其是云计算的基石,虽然近些年已经有被 Kubernets 拍在沙滩上的意思,但是虚拟机相比于容器,其在腾讯云、华为云、阿里云等云厂商,还是主要对外的计算服务。
这里我们采用最原始的部署方式来部署一个 OpenStack。
官方的安装方式:openstack Installation overview
资源准备
Ubuntu 20.04 主机2台。
| 主机名称 | 名称 | 网卡 | 配置 |
|---|
| instance_001 | 控制节点 | 192.168.100.10 (Host-only) | CPU 2 RAM 4G |
instance_002 | 网络节点 | 192.168.100.11 (Host-only)
192.168.101.11 (Host-only)
192.168.0.106 (Bridge) | CPU 2 RAM 2G |
| instance_003 | 计算节点 | 192.168.100.12 (Host-only)
192.168.101.12 (Host-only) | CPU 2 RAM 4G |
由于最新的官方文档 yago 的部署文档是2节点,所以下面还是按2节点算。
部署架构
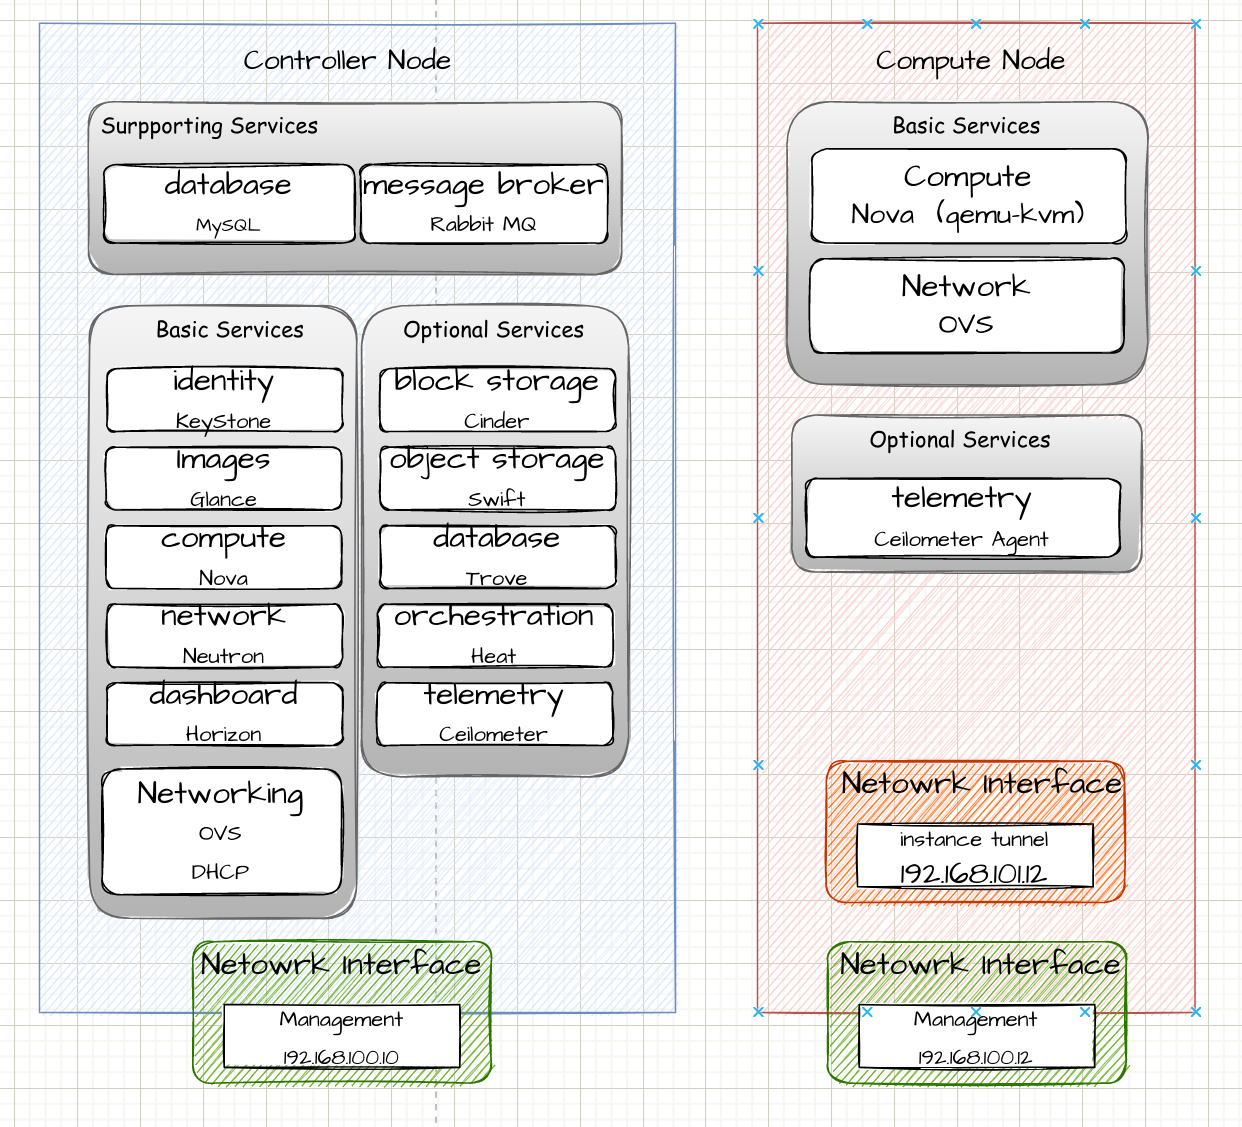
安装官方文档:openstack install guide
官网的中文文档只支持非常老旧的 Mitaka ,想要安装最新版本必须看英文文档。
本文安装 2022 年的最新版本 yoga openstack release series
部署前准备
- 安装 MySQL、rabbitmq、memcached、etcd (以下操作均在 controller 节点)
 1
 2
 3
 4
 5
 6
 7
 8
 9
10
11
12
13
14
15
16
17
18
19
20
21
22
23
24
25
26
27
28
29
30
31
| ################## 安装 MySQL ##################
apt install mysql-server python3-pymysql
# 一旦安装完成,编辑配置文件 /etc/mysql/mysql.conf.d/mysql.cnf
[mysqld]
bind-address = 0.0.0.0
default-storage-engine = innodb
innodb_file_per_table = on
max_connections = 4096
collation-server = utf8mb4_0900_ai_ci
character-set-server = utf8mb4
# 启动MySQL服务并验证。输入
systemctl start mysql
systemctl status mysql
################## 安装 RabbitMQ ##################
apt -y install rabbitmq-server
# 配置文件插入以下一句话, 并且启动
vim /etc/rabbitmq/rabbitmq-env.conf
NODENAME=rabbit@controller
systemctl start rabbitmq-server
# 添加用户
rabbitmqctl add_user openstack openstack
rabbitmqctl set_permissions openstack ".*" ".*" ".*"
################## 安装mencached ##################
apt -y install memcached python3-memcache
systemctl start memcached
|
1
| sysctl -w net.ipv4.ip_forward=1
|
1
2
3
4
5
6
7
8
| # 所有节点
apt install chrony
# controller 节点配置 /etc/chrony/chrony.conf
allow 192.168.100.0/24
# 其余节点
server 192.168.100.10 iburst
# 查看是否同步controller 节点
chronyc sources -v
|
1
2
3
4
5
| apt update && apt upgrade
# 所有节点都需要安装
add-apt-repository cloud-archive:yoga
# client installation
apt install python3-openstackclient python3-pip
|
部署 Controller 节点
以下操作在 instance_001 节点上进行
Keystone
Identity 主要有两个功能,一:实现用户的管理、认证和授权。二:服务目录,存储所有可用服务的信息库,包含其API endpoint
详见:认识 OpenStack – Keystone
安装:Keystone installation Tutorial for Ubuntu
安装 keystone
- 安装 keystone 组件
安装额外的 openstack 配置管理工具包,ubuntu里面叫crudini,CentOS 中叫做 openstack-utils。OpenStack配置文件的快速修改方法
- 配置 MySQL
因为ubuntu20.04 默认安装的是 mysql8.0,创建用户和授权的方式不太一样,用官网的命令会报错。
1
2
3
4
| mysql
> CREATE DATABASE keystone;
> CREATE USER 'keystone'@'%' IDENTIFIED BY 'KEYSTONE_DBPASS';
> GRANT ALL PRIVILEGES ON keystone.* to 'keystone'@'%' WITH GRANT OPTION;
|
- 使用 crudini 修改配置文件
/etc/keystone/keystone.conf
1
2
3
4
| # MySQL 访问密码填充
crudini --set /etc/keystone/keystone.conf database connection "mysql+pymysql://keystone:KEYSTONE_DBPASS@controller/keystone"
# 配置 Fernet 令牌提供程序
crudini --set /etc/keystone/keystone.conf token provider fernet
|
- 填充Identity service 数据库
执行完成之后可以通过
1
| su -s /bin/sh -c "keystone-manage db_sync" keystone
|
- 初始化 Fernet 密钥存储库:
1
2
| keystone-manage fernet_setup --keystone-user keystone --keystone-group keystone
keystone-manage credential_setup --keystone-user keystone --keystone-group keystone
|
- 创建管理员用户
1
2
3
4
5
| keystone-manage bootstrap --bootstrap-password ADMIN_PASS \
--bootstrap-admin-url http://controller:5000/v3/ \
--bootstrap-internal-url http://controller:5000/v3/ \
--bootstrap-public-url http://controller:5000/v3/ \
--bootstrap-region-id RegionOne
|
- 配置 Apache HTTP 服务器
刚才安装的 keystone 会默认安装一个 Apache 服务器,为Keystone 提供restapi 服务。编辑 /etc/apache2/apache2.conf 文件并配置 ServerName 选项以控制 Controller 节点
再通过 systemctl restart apache2 重启服务
- 将一些环境变量保存起来
1
2
3
4
5
6
7
| export OS_USERNAME=admin
export OS_PASSWORD=ADMIN_PASS
export OS_PROJECT_NAME=admin
export OS_USER_DOMAIN_NAME=Default
export OS_PROJECT_DOMAIN_NAME=Default
export OS_AUTH_URL=http://controller:5000/v3
export OS_IDENTITY_API_VERSION=3
|
- 创建一个 service project 后面会用到
1
2
| openstack project create --domain default \
--description "Service Project" service
|
configure bash shell script: http://s1.kiosk007.top/config_controller_keystone.sh
创建相应的domain、project、user和role
Identity 服务为每个 Openstack 服务提供身份验证服务,身份验证服务需要 domain、project、user 和 role 配合使用。
下面的操作仅是演示创建过程:
假设我们要创建一个叫 kiosk 的集团公司(domain),该 domain 下有 kiosk007 和 kiosk404 两个项目部(project),
 1
 2
 3
 4
 5
 6
 7
 8
 9
10
11
12
13
14
| # 创建 kiosk domain
openstack domain create --description "Kiosk Domain" kiosk
# 创建2个project,分别是 kiosk404 和 kiosk007
openstack project create --domain kiosk \
--description "kiosk404 Service Project" kiosk404
openstack project create --domain kiosk \
--description "kiosk007 Service Project" kiosk007
# 创建一个用户 kiosk_user
openstack user create --domain kiosk \
--password-prompt kiosk_user
# 创建一个角色 kiosk_role
openstack role create kiosk_role
# 将 kiosk_role 角色添加到 kiosk007项目中和 kiosk_user用户
openstack role add --project kiosk007 --user kiosk_user kiosk_role
|
验证操作
- 作为 admin 用户,请求一个身份验证令牌
 1
 2
 3
 4
 5
 6
 7
 8
 9
10
11
12
| # openstack --os-auth-url http://controller:5000/v3 \
--os-project-domain-name Default --os-user-domain-name Default \
--os-project-name admin --os-username admin token issue
+------------+-----------------------------------------------------------------------------------------------------------------------------------------------------------------------------------------+
| Field | Value |
+------------+-----------------------------------------------------------------------------------------------------------------------------------------------------------------------------------------+
| expires | 2022-08-28T08:21:10+0000 |
| id | gAAAAABjCxdmXJaVJvlf11ebyp0QJDjOGWwGgcnv49N5VKvafu4rHlYlKR8QbRhtm9H30YcDrgyBXZE6xSgdVkewJ4vj4AuI42ul4qMWGsKSNDRyc96QqfgT-AwJmJ110MqW_NeSendh4NTT8XJR55B18K7N5of3D2cPgIthcw4UpHHLR0se7CI |
| project_id | 2348b19ca892479f9dd0c5619ef49c56 |
| user_id | 201783c64c6545da8fab7bf5c619dce1 |
+------------+-----------------------------------------------------------------------------------------------------------------------------------------------------------------------------------------+
|
- 作为 kiosk_user ,请求一个身份验证令牌
 1
 2
 3
 4
 5
 6
 7
 8
 9
10
11
12
| # unset OS_AUTH_URL OS_PASSWORD
# openstack --os-auth-url http://controller:5000/v3 --os-project-domain-name kiosk --os-user-domain-name kiosk --os-project-name kiosk007 --os-username kiosk_user token issue
Password:
+------------+-----------------------------------------------------------------------------------------------------------------------------------------------------------------------------------------+
| Field | Value |
+------------+-----------------------------------------------------------------------------------------------------------------------------------------------------------------------------------------+
| expires | 2022-08-28T08:22:49+0000 |
| id | gAAAAABjCxfJYU9t-0i8OiIYDjfURxAGbkx78Vs8JyKdkFBf9dFlHHna4MYmnPx8AZ4gwTHqYGSWNTPFkAM4Cdi5sFHOSxr2x5YBIwQBOqwGKX7NaV7shBz0q-KA2_d6wwUjgwSYPXU5NtWj1SMqoprSKE22CCXUVVy6YVT-6JfkZqeGAiWjE-M |
| project_id | d5a2405e86254ef5826bc2d824dcea19 |
| user_id | 676af3f02e9048ebbe3cdc83f5e28ddd |
+------------+-----------------------------------------------------------------------------------------------------------------------------------------------------------------------------------------+
|
Glance
Image Service 在 OpenStack 中注册、发现及获取 VM 的映像文件。VM的映像文件本身存储在对象存储或分布式文件系统中等。
详见:认识 OpenStack – Glance
安装:Glance installation Tutorial for Ubuntu
配置数据库
1
2
3
4
| mysql
> CREATE DATABASE glance;
> CREATE USER 'glance'@'%' IDENTIFIED BY 'GLANCE_DBPASS';
> GRANT ALL PRIVILEGES ON glance.* to 'glance'@'%' WITH GRANT OPTION;
|
创建 endpoint 和 user 等
 1
 2
 3
 4
 5
 6
 7
 8
 9
10
11
12
| . admin-openrc
# 创建 glance 用户
openstack user create --domain default --password-prompt glance
# 将 admin 角色加到 glance 用户和 service 项目
openstack role add --project service --user glance admin
# 创建 glance 服务实体
openstack service create --name glance --description "OpenStack Image" image
# 创建Image service的API服务 endpoint
openstack endpoint create --region RegionOne image public http://controller:9292
openstack endpoint create --region RegionOne image internal http://controller:9292
openstack endpoint create --region RegionOne image admin http://controller:9292
|
安装 Glance
- 安装 glance
- 配置 /etc/glance/glance-api.conf
 1
 2
 3
 4
 5
 6
 7
 8
 9
10
11
12
13
14
15
16
17
18
19
20
21
22
23
24
25
26
27
28
29
30
31
32
33
34
35
| # [database] section 中,编辑访问数据库
[database]
connection = mysql+pymysql://glance:GLANCE_DBPASS@controller/glance
# [keystone_authtoken] 和 [paste_deploy] section 中,编辑认证信息
[keystone_authtoken]
www_authenticate_uri = http://controller:5000
auth_url = http://controller:5000
memcached_servers = controller:11211
auth_type = password
project_domain_name = Default
user_domain_name = Default
project_name = service
username = glance
password = GLANCE_PASS # 请替换
[paste_deploy]
flavor = keystone
# [glance_stone] section 中,编辑image存储的位置
[glance_store]
stores = file,http
default_store = file
filesystem_store_datadir = /var/lib/glance/images/
# [oslo_limit] section 中编辑访问 keystone
[oslo_limit]
auth_url = http://controller:5000
auth_type = password
user_domain_id = default
username = glance
system_scope = all
password = openstack
endpoint_id = http://controller:9292
region_name = RegionOne
|
- 确保 glance 用户对系统范围都有读权限。
1
| openstack role add --user glance --user-domain Default --system all reader
|
- 填充数据库
1
| su -s /bin/sh -c "glance-manage db_sync" glance
|
- 重启服务
systemctl restart glance-api
configure bash shell script: http://s1.kiosk007.top/config_controller_glance.sh
验证
下载一个镜像,再传到 glance 服务上。
1
2
3
4
5
| wget http://download.cirros-cloud.net/0.4.0/cirros-0.4.0-x86_64-disk.img
glance image-create --name "cirros" \
--file cirros-0.4.0-x86_64-disk.img \
--disk-format qcow2 --container-format bare \
--visibility=public
|
可以使用openstack image list或者glance image-list查看镜像。
- 查看 image:glance image-show IMAGE_ID
- 下载 image:glance image-download –progress –file=./cloud.img IMAGE_ID
- 删除 image:glance image-delelte IMAGE_ID
磁盘映像文件可以自己制作,比如 VMBuilder、VeeWee、imagefactory 等。
placement
Placement 参与到 nova-scheduler 选择目标主机的调度流程中,负责跟踪记录 Resource Provider 的 Inventory 和 Usage,并使用不同的 Resource Classes 来划分资源类型,使用不同的 Resource Traits 来标记资源特征。
– 其负责跟踪云中可用资源的清单,并协助选择在创建虚拟机时将使用这些资源的哪个提供者。
Ocata 版本的 Placement API 是一个可选项,建议用户启用并替代 CpuFilter、CoreFilter 和 DiskFilter。Pike 版本则强制要求启动 Placement API 服务,否则 nova-compute service 无法正常运行。
详见:OpenStack Placement
官方文档:OpenStack Compute (nova)
安装:Install and configure Placement for Ubuntu
配置数据库
1
2
3
4
| mysql
> CREATE DATABASE placement;
> CREATE USER 'placement'@'%' IDENTIFIED BY 'PLACEMENT_DBPASS';
> GRANT ALL PRIVILEGES ON placement.* to 'placement'@'%' WITH GRANT OPTION;
|
创建 User 和 Endpoints
 1
 2
 3
 4
 5
 6
 7
 8
 9
10
11
12
13
14
15
| . admin-openrc
# 创建 placement user
openstack user create --domain default --password-prompt placement
# 将 placement 用户加入 service project 和 admin role
openstack role add --project service --user placement admin
# 创建 placement API service
openstack service create --name placement \
--description "Placement API" placement
# 创建 placement endpoints
openstack endpoint create --region RegionOne \
placement public http://controller:8778
openstack endpoint create --region RegionOne \
placement internal http://controller:8778
openstack endpoint create --region RegionOne \
placement admin http://controller:8778
|
安装 placement
- 安装 placement-api
1
| apt install placement-api
|
- 编辑
/etc/placement/placement.conf 文件
 1
 2
 3
 4
 5
 6
 7
 8
 9
10
11
12
13
14
15
16
17
18
| # [placement_database] section 中,编辑访问数据库
[placement_database]
connection = mysql+pymysql://placement:PLACEMENT_DBPASS@controller/placement
# [keystone_authtoken] 和 [api] section 中,编辑认证信息
[api]
auth_strategy = keystone
[keystone_authtoken]
auth_url = http://controller:5000/v3
memcached_servers = controller:11211
auth_type = password
project_domain_name = Default
user_domain_name = Default
project_name = service
username = placement
password = PLACEMENT_PASS # 请替换
|
- 填充数据库
1
| su -s /bin/sh -c "placement-manage db sync" placement
|
- 重启 apache2
1
| systemctl restart apache2
|
configure bash shell script: http://s1.kiosk007.top/config_controller_placement.sh
验证
执行检查状态
 1
 2
 3
 4
 5
 6
 7
 8
 9
10
11
12
13
| placement-status upgrade check
+----------------------------------+
| Upgrade Check Results |
+----------------------------------+
| Check: Missing Root Provider IDs |
| Result: Success |
| Details: None |
+----------------------------------+
| Check: Incomplete Consumers |
| Result: Success |
| Details: None |
+----------------------------------+
|
执行 pip3 install osc-placement 安装,可以列出资源类和特征。
1
2
3
4
5
6
7
8
9
| $ openstack --os-placement-api-version 1.2 resource class list --sort-column name
+----------------------------+
| name |
+----------------------------+
| DISK_GB |
| FPGA |
| IPV4_ADDRESS |
...
|
Nova
Compute Service ,主要提供计算服务,但本身Nova 又分为了计算节点和控制节点,不是那么简单的。Nova有很多组件组成,一些组件随着 Openstack 的更新拆出去了
组件:
详见:认识 OpenStack – Nova
安装:Install and configure controller node for Ubuntu
配置数据库
1
2
3
4
5
6
7
8
9
| mysql
> CREATE DATABASE nova_api;
> CREATE DATABASE nova;
> CREATE DATABASE nova_cell0;
> CREATE USER 'nova'@'%' IDENTIFIED BY 'NOVA_DBPASS';
> GRANT ALL PRIVILEGES ON nova_api.* to 'nova'@'%' WITH GRANT OPTION;
> GRANT ALL PRIVILEGES ON nova.* to 'nova'@'%' WITH GRANT OPTION;
> GRANT ALL PRIVILEGES ON nova_cell0.* to 'nova'@'%' WITH GRANT OPTION;
|
创建 endpoint、service 和 user 等
 1
 2
 3
 4
 5
 6
 7
 8
 9
10
11
12
13
14
| # 创建 nova 用户
openstack user create --domain default --password-prompt nova
# 将 admin role 加载到 nova 用户上
openstack role add --project service --user nova admin
# 创建 nova 用到的 service
openstack service create --name nova \
--description "OpenStack Compute" compute
# 创建计算节点的 endpoint
openstack endpoint create --region RegionOne \
compute public http://controller:8774/v2.1
openstack endpoint create --region RegionOne \
compute internal http://controller:8774/v2.1
openstack endpoint create --region RegionOne \
compute admin http://controller:8774/v2.1
|
安装 Nova
- 安装 nova
1
| apt install nova-api nova-conductor nova-novncproxy nova-scheduler
|
- 编辑
/etc/nova/nova.conf 文件并完成以下操作
 1
 2
 3
 4
 5
 6
 7
 8
 9
10
11
12
13
14
15
16
17
18
19
20
21
22
23
24
25
26
27
28
29
30
31
32
33
34
35
36
37
38
39
40
41
42
43
44
45
46
47
48
49
50
51
52
53
54
| # [api_database] 和 [database] 配置访问数据库
[api_database]
connection = mysql+pymysql://nova:NOVA_DBPASS@controller/nova_api
[database]
connection = mysql+pymysql://nova:NOVA_DBPASS@controller/nova
# [DEFAULT] 中配置 RabbitMQ消息队列访问
[DEFAULT]
transport_url = rabbit://openstack:openstack@controller:5672/
# 在 [api] 和 [keystone_authtoken] 配置身份服务访问
[api]
auth_strategy = keystone
[keystone_authtoken]
www_authenticate_uri = http://controller:5000/
auth_url = http://controller:5000/
memcached_servers = controller:11211
auth_type = password
project_domain_name = Default
user_domain_name = Default
project_name = service
username = nova
password = NOVA_PASS # 请替换
# [DEFAULT] 配置 my_ip 控制节点的IP
[DEFAULT]
my_ip = 192.168.100.10
# [vnc] 中配置vnc的地址
[vnc]
enabled = true
server_listen = $my_ip
server_proxyclient_address = $my_ip
# [glance] 中配置image service api
[glance]
api_servers = http://controller:9292
# [oslo_concurrency] 中配置锁路径
[oslo_concurrency]
lock_path = /var/lib/nova/tmp
# [placement] 中配置对 Placement 服务的访问
[placement]
region_name = RegionOne
project_domain_name = Default
project_name = service
auth_type = password
user_domain_name = Default
auth_url = http://controller:5000/v3
username = placement
password = PLACEMENT_PASS # 请替换
|
- 填充 nova-api 数据库
1
| su -s /bin/sh -c "nova-manage api_db sync" nova
|
- 注册 cell0 数据库
1
| su -s /bin/sh -c "nova-manage cell_v2 map_cell0" nova
|
- 创建 cell1 cell
1
| su -s /bin/sh -c "nova-manage cell_v2 create_cell --name=cell1 --verbose" nova
|
- 填充数据库
1
| su -s /bin/sh -c "nova-manage db sync" nova
|
- 验证 nova cell0 和 cell1 是否注册正确
1
2
3
4
5
6
7
8
| su -s /bin/sh -c "nova-manage cell_v2 list_cells" nova
+-------+--------------------------------------+------------------------------------------+-------------------------------------------------+----------+
| Name | UUID | Transport URL | Database Connection | Disabled |
+-------+--------------------------------------+------------------------------------------+-------------------------------------------------+----------+
| cell0 | 00000000-0000-0000-0000-000000000000 | none:/ | mysql+pymysql://nova:****@controller/nova_cell0 | False |
| cell1 | 2c673c30-0a25-477d-a39b-0394bc2309be | rabbit://openstack:****@controller:5672/ | mysql+pymysql://nova:****@controller/nova | False |
+-------+--------------------------------------+------------------------------------------+-------------------------------------------------+----------+
|
configure bash shell script: http://s1.kiosk007.top/config_controller_nova.sh
安装完成重启服务
1
2
3
4
| systemctl restart nova-api
systemctl restart nova-scheduler
systemctl restart nova-conductor
systemctl restart nova-novncproxy
|
Neutron
Controller 节点需要部署 neutron-server
Compute 节点需要部署 neutron-*(plugin)-agent
Network 节点需要部署 neutron-*(plugin)-agent、neutron-l3-agent、neutron-dhcp-agent
neutron-*(plugin)-agent,如 neutron-linuxbridge-agent
Openstack 中的物理网络连接架构。
管理网络(management network)ens37 192.168.100.0/24
数据网络(management network)ens38 192.168.101.0/24
外部网络(external network)ens39 桥接(仅网络节点)
详见 OpenStack Networking
详见:认识 OpenStack – Neutron \ Neutron’s documentation
安装:Install and configure for Ubuntu
创建数据库
1
2
3
4
| mysql
> CREATE DATABASE neutron;
> CREATE USER 'neutron'@'%' IDENTIFIED BY 'NEUTRON_DBPASS';
> GRANT ALL PRIVILEGES ON neutron.* to 'neutron'@'%' WITH GRANT OPTION;
|
创建 user、service、endpoint
 1
 2
 3
 4
 5
 6
 7
 8
 9
10
11
12
13
14
| # 创建neutron 用户
openstack user create --domain default --password-prompt neutron
# 绑定
openstack role add --project service --user neutron admin
# 创建 service
openstack service create --name neutron \
--description "OpenStack Networking" network
# 创建endpoint
openstack endpoint create --region RegionOne \
network public http://controller:9696
openstack endpoint create --region RegionOne \
network internal http://controller:9696
openstack endpoint create --region RegionOne \
network admin http://controller:9696
|
安装 Neutron 网络
这里创建自服务网络 Networking Option 2: Self-service networks
- 安装 neutron
1
| apt install neutron-server neutron-plugin-ml2
|
- 编辑配置文件 /etc/neutron/neutron.conf
 1
 2
 3
 4
 5
 6
 7
 8
 9
10
11
12
13
14
15
16
17
18
19
20
21
22
23
24
25
26
27
28
29
30
31
32
33
34
35
36
37
38
39
40
41
42
43
44
45
46
| # [database] 配置访问数据库
connection = mysql+pymysql://neutron:NEUTRON_DBPASS@controller/neutron
# [DEFAULT] 配置 2层网络(ML2)插件,router service 和 overlapping IP
[DEFAULT]
core_plugin = ml2
service_plugins = router
allow_overlapping_ips = true
# [DEFAULT] 配置 rabbitmq
[DEFAULT]
transport_url = rabbit://openstack:openstack@controller
# [DEFAULT] 和 [keystone_authtoken] 配置 keystone
[DEFAULT]
auth_strategy = keystone
[keystone_authtoken]
www_authenticate_uri = http://controller:5000
auth_url = http://controller:5000
memcached_servers = controller:11211
auth_type = password
project_domain_name = default
user_domain_name = default
project_name = service
username = neutron
password = NEUTRON_PASS # 请修改
# [DEFAULT]和[nova]配置Networking以通知Compute网络拓扑更改
[DEFAULT]
notify_nova_on_port_status_changes = true
notify_nova_on_port_data_changes = true
[nova]
auth_url = http://controller:5000
auth_type = password
project_domain_name = default
user_domain_name = default
region_name = RegionOne
project_name = service
username = nova
password = NOVA_PASS # 请修改
# [oslo_concurrency]部分中配置锁路径
[oslo_concurrency]
lock_path = /var/lib/neutron/tmp
|
- 编辑 /etc/neutron/plugins/ml2/ml2_conf.ini 配置 Modular Layer 2 (ML2) 插件
 1
 2
 3
 4
 5
 6
 7
 8
 9
10
11
12
13
14
15
16
17
18
| # [ml2] 启用 flat,VLAN和VXLAN
[ml2]
type_drivers = flat,vlan,vxlan
tenant_network_types = vxlan # 启用VXLAN自助服务网络
mechanism_drivers = linuxbridge,l2population # 启用Linux桥接和2层填充
extension_drivers = port_security # 启用端口安全扩展
# [ml2_type_flat]
[ml2_type_flat]
flat_networks = provider
# [ml2_type_vxlan] VXLAN网络标识符范围
[ml2_type_vxlan]
vni_ranges = 1:1000
# [securitygroup] 启用ipset提供安全组规则效率
[securitygroup]
enable_ipset = true
|
- 编辑 /etc/neutron/plugins/ml2/linuxbridge_agent.ini
 1
 2
 3
 4
 5
 6
 7
 8
 9
10
11
| [linux_bridge]
physical_interface_mappings = provider:ens37
[vxlan]
enable_vxlan = true
local_ip = 192.168.100.10
l2_population = true
[securitygroup]
enable_security_group = true
firewall_driver = neutron.agent.linux.iptables_firewall.IptablesFirewallDriver
|
- 为了启用网络桥接支持,需要加载 br_netfilter 内核模块,使用命令
modprobe br_netfilter 加载。执行成功后
1
2
3
4
5
6
7
8
| # sysctl -a |grep bridge
net.bridge.bridge-nf-call-arptables = 1
net.bridge.bridge-nf-call-ip6tables = 1
net.bridge.bridge-nf-call-iptables = 1
net.bridge.bridge-nf-filter-pppoe-tagged = 0
net.bridge.bridge-nf-filter-vlan-tagged = 0
net.bridge.bridge-nf-pass-vlan-input-dev = 0
|
- 编辑 /etc/neutron/l3_agent.ini 配置3层网络
1
2
| [DEFAULT]
interface_driver = linuxbridge
|
- 编辑 /etc/neutron/dhcp_agent.ini 配置 DHCP 服务
1
2
3
4
| [DEFAULT]
interface_driver = linuxbridge
dhcp_driver = neutron.agent.linux.dhcp.Dnsmasq
enable_isolated_metadata = true
|
- 编辑 /etc/neutron/metadata_agent.ini 配置 metadata agent
1
2
3
4
| [DEFAULT]
# ...
nova_metadata_host = controller
metadata_proxy_shared_secret = METADATA_SECRET
|
- 编辑 /etc/nova/nova.conf 中的 neutron 部分
 1
 2
 3
 4
 5
 6
 7
 8
 9
10
| auth_url = http://controller:5000
auth_type = password
project_domain_name = Default
user_domain_name = Default
region_name = RegionOne
project_name = service
username = neutron
password = redhat
service_metadata_proxy = true
metadata_proxy_shared_secret = METADATA_SECRET # 和上面的 metadata_secret 保持一致即可
|
- 同步 neutron 数据库
1
2
| su -s /bin/sh -c "neutron-db-manage --config-file /etc/neutron/neutron.conf \
--config-file /etc/neutron/plugins/ml2/ml2_conf.ini upgrade head" neutron
|
安装完毕重启服务
1
2
3
4
5
6
7
| service nova-api restart
service neutron-server restart
service neutron-linuxbridge-agent restart
service neutron-dhcp-agent restart
service neutron-metadata-agent restart
service neutron-l3-agent restart
|
configure bash shell script: http://s1.kiosk007.top/config_controller_neutron.sh
Horizon
安装:Install and configure for Ubuntu
安装 Horizon
- 安装 dashboard 可视化界面
1
| apt install openstack-dashboard
|
- 配置文件 /etc/openstack-dashboard/local_settings.py
 1
 2
 3
 4
 5
 6
 7
 8
 9
10
11
12
13
14
15
16
17
18
19
20
21
22
23
24
25
26
27
28
29
| OPENSTACK_HOST = "controller"
ALLOWED_HOSTS = ['*']
SESSION_ENGINE = 'django.contrib.sessions.backends.cache'
CACHES = {
'default': {
'BACKEND': 'django.core.cache.backends.memcached.MemcachedCache',
'LOCATION': 'controller:11211',
}
}
OPENSTACK_KEYSTONE_URL = "http://%s:5000/v3" % OPENSTACK_HOST
OPENSTACK_KEYSTONE_MULTIDOMAIN_SUPPORT = True
OPENSTACK_API_VERSIONS = {
"identity": 3,
"image": 2,
"volume": 3,
}
OPENSTACK_KEYSTONE_DEFAULT_DOMAIN = "Default"
OPENSTACK_KEYSTONE_DEFAULT_ROLE = "member"
OPENSTACK_NEUTRON_NETWORK = {
'enable_router': False,
'enable_quotas': False,
'enable_ipv6': False,
'enable_distributed_router': False,
'enable_ha_router': False,
'enable_fip_topology_check': False
}
TIME_ZONE = "Asia/Shanghai"
|
Cinder
Cinder 提供块存储功能,其实 Cinder 本不应该部署在 Compute 节点,块存储服务本应该是独立与 Openstack Controller、Compute 节点的存在。
其提供 Block Storage Service。其由 cinder-api、cinder-volume、cinder-scheduler 组成。
详见:认识 OpenStack – Cinder
安装:Install and configure for Ubuntu
配置MySQL数据库
1
2
3
4
| mysql
> CREATE DATABASE cinder;
> CREATE USER 'cinder'@'%' IDENTIFIED BY 'CINDER_DBPASS';
> GRANT ALL PRIVILEGES ON cinder.* to 'cinder'@'%' WITH GRANT OPTION;
|
创建相应的 user、service、endpoint
 1
 2
 3
 4
 5
 6
 7
 8
 9
10
11
12
| openstack user create --domain default --password-prompt cinder
openstack role add --project service --user cinder admin
# 创建 serivce
openstack service create --name cinderv3 \
--description "OpenStack Block Storage" volumev3
# 创建 endpoint
openstack endpoint create --region RegionOne \
volumev3 public http://controller:8776/v3/%\(project_id\)s
openstack endpoint create --region RegionOne \
volumev3 internal http://controller:8776/v3/%\(project_id\)s
openstack endpoint create --region RegionOne \
volumev3 admin http://controller:8776/v3/%\(project_id\)s
|
安装 cinder
- 安装 cinder
1
| apt install cinder-api cinder-scheduler
|
- 修改配置文件 /etc/cinder/cinder.conf
 1
 2
 3
 4
 5
 6
 7
 8
 9
10
11
12
13
14
15
16
17
| [database]
connection = mysql+pymysql://cinder:CINDER_DBPASS@controller/cinder
[DEFAULT]
auth_strategy = keystone
my_ip = 192.168.100.10
[keystone_authtoken]
www_authenticate_uri = http://controller:5000
auth_url = http://controller:5000
memcached_servers = controller:11211
auth_type = password
project_domain_name = default
user_domain_name = default
project_name = service
username = cinder
password = CINDER_PASS # 请替换
|
- 同步数据库
1
| su -s /bin/sh -c "cinder-manage db sync" cinder
|
- 编辑 /etc/nova/nova.conf
1
2
| [cinder]
os_region_name = RegionOne
|
- 重启服务
1
2
3
| systemctl restart nova-api
systemctl restart cinder-scheduler
systemctl restart apache2
|
部署 Compute 节点
以下操作在 instance_003 节点上进行
Nova
安装:Install and configure a compute node for Ubuntu
安装 Nova
- 安装
nova-compute
1
| apt install nova-compute
|
- 修改配置文件 /etc/nova/nova.conf
 1
 2
 3
 4
 5
 6
 7
 8
 9
10
11
12
13
14
15
16
17
18
19
20
21
22
23
24
25
26
27
28
29
30
31
32
33
34
35
36
37
38
39
40
41
42
43
44
45
46
47
48
| # [DEFAULT] 配置 RabbitMQ 消息队列
[DEFAULT]
transport_url = rabbit://openstack:openstack@controller
# [api] 和 [keystone_authtoken] 中编辑认证信息
[api]
auth_strategy = keystone
[keystone_authtoken]
www_authenticate_uri = http://controller:5000/
auth_url = http://controller:5000/
memcached_servers = controller:11211
auth_type = password
project_domain_name = Default
user_domain_name = Default
project_name = service
username = nova
password = NOVA_PASS # 请替换
# [DEFAULT] 中替换为计算节点的IP即 instance_003 的网络接口 ens33 ip 192.168.100.12
my_ip = 192.168.100.12
# [vnc] 部分启用和配置远程控制台访问
[vnc]
enabled = true
server_listen = 0.0.0.0
server_proxyclient_address = $my_ip
novncproxy_base_url = http://controller:6080/vnc_auto.html
# [glance] 配置 image service API位置
[glance]
api_servers = http://controller:9292
# [oslo_concurrency] 配置锁路径
[oslo_concurrency]
lock_path = /var/lib/nova/tmp
#[placement] API
[placement]
region_name = RegionOne
project_domain_name = Default
project_name = service
auth_type = password
user_domain_name = Default
auth_url = http://controller:5000/v3
username = placement
password = PLACEMENT_PASS # 请替换
|
- 修改配置文件
/etc/nova/nova.conf 的 neutron 部分内容
1
2
3
4
5
6
7
8
9
| [neutron]
auth_url = http://controller:5000
auth_type = password
project_domain_name = Default
user_domain_name = Default
region_name = RegionOne
project_name = service
username = neutron
password = redhat
|
- [可选] 修改配置文件
/etc/nova/nova-compute.conf
执行 egrep -c '(vmx|svm)' /proc/cpuinfo 可以验证计算节点是否支持虚拟机的硬件加速,如果不支持则只能使用 qemu 这种完全虚拟化技术,否则可以使用 kvm 来加速CPU 和 内存相关的访问。
1
2
| [libvirt]
virt_type = qemu
|
- 重启服务
systemctl restart nova-compute
将计算节点添加到cell数据库
切换到控制节点
- 首先确认数据库中有计算主机
1
2
3
4
5
6
7
| openstack compute service list --service nova-compute
+--------------------------------------+--------------+-------------+------+---------+-------+----------------------------+
| ID | Binary | Host | Zone | Status | State | Updated At |
+--------------------------------------+--------------+-------------+------+---------+-------+----------------------------+
| ba5c46c2-65ae-4c14-ae71-8edcb1096b80 | nova-compute | instance003 | nova | enabled | up | 2022-09-01T02:13:21.000000 |
+--------------------------------------+--------------+-------------+------+---------+-------+----------------------------+
|
- 发现该节点
1
2
3
4
5
6
7
8
| su -s /bin/sh -c "nova-manage cell_v2 discover_hosts --verbose" nova
Found 2 cell mappings.
Skipping cell0 since it does not contain hosts.
Getting computes from cell 'cell1': 8f33b975-8d3f-4cf9-a4ee-e6691b863ba6
Checking host mapping for compute host 'instance003': 477aa1a0-de51-4ada-8229-d28aa1ce9bf3
Creating host mapping for compute host 'instance003': 477aa1a0-de51-4ada-8229-d28aa1ce9bf3
Found 1 unmapped computes in cell: 8f33b975-8d3f-4cf9-a4ee-e6691b863ba6
|
configure bash shell script: http://s1.kiosk007.top/config_compute_nova.sh
验证
- 列出服务组件,验证启动和注册成功
1
2
3
4
5
6
7
8
9
| openstack compute service list
+--------------------------------------+----------------+-------------+----------+---------+-------+----------------------------+
| ID | Binary | Host | Zone | Status | State | Updated At |
+--------------------------------------+----------------+-------------+----------+---------+-------+----------------------------+
| 7cca2bba-fb95-4dc6-8238-4da4da6be336 | nova-scheduler | instance001 | internal | enabled | up | 2022-09-01T02:17:30.000000 |
| 3bb4f73f-d22a-46ad-ac95-d5d619d27bb1 | nova-conductor | instance001 | internal | enabled | up | 2022-09-01T02:17:30.000000 |
| ba5c46c2-65ae-4c14-ae71-8edcb1096b80 | nova-compute | instance003 | nova | enabled | up | 2022-09-01T02:17:31.000000 |
+--------------------------------------+----------------+-------------+----------+---------+-------+----------------------------+
|
- 列出身份服务
 1
 2
 3
 4
 5
 6
 7
 8
 9
10
11
12
13
14
15
16
17
18
19
20
21
22
23
24
25
26
27
28
29
30
31
32
33
34
| openstack catalog list
+-----------+-----------+-----------------------------------------+
| Name | Type | Endpoints |
+-----------+-----------+-----------------------------------------+
| placement | placement | RegionOne |
| | | admin: http://controller:8778 |
| | | RegionOne |
| | | internal: http://controller:8778 |
| | | RegionOne |
| | | public: http://controller:8778 |
| | | |
| glance | image | RegionOne |
| | | admin: http://controller:9292 |
| | | RegionOne |
| | | internal: http://controller:9292 |
| | | RegionOne |
| | | public: http://controller:9292 |
| | | |
| nova | compute | RegionOne |
| | | admin: http://controller:8774/v2.1 |
| | | RegionOne |
| | | internal: http://controller:8774/v2.1 |
| | | RegionOne |
| | | public: http://controller:8774/v2.1 |
| | | |
| keystone | identity | RegionOne |
| | | public: http://controller:5000/v3/ |
| | | RegionOne |
| | | admin: http://controller:5000/v3/ |
| | | RegionOne |
| | | internal: http://controller:5000/v3/ |
| | | |
+-----------+-----------+-----------------------------------------+
|
- 检查 cell 和 placement API 是否运行成功
1
2
3
4
5
6
7
8
9
| nova-status upgrade check
+-------------------------------------------+
| Upgrade Check Results |
+-------------------------------------------+
| Check: Cells v2 |
| Result: Success |
| Details: None |
+-------------------------------------------+
...
|
Neutron
安装:Install and configure compute node
安装 neutron 组件
- 安装 linuxbridge-agent
1
| apt install neutron-linuxbridge-agent
|
- 编辑 /etc/neutron/neutron.conf
 1
 2
 3
 4
 5
 6
 7
 8
 9
10
11
12
13
14
| [DEFAULT]
transport_url = rabbit://openstack:openstack@controller
auth_strategy = keystone
[keystone_authtoken]
www_authenticate_uri = http://controller:5000
auth_url = http://controller:5000
memcached_servers = controller:11211
auth_type = password
project_domain_name = default
user_domain_name = default
project_name = service
username = neutron
password = NEUTRON_PASS # 请替换
|
选择自服务网络的配置
参考:Networking Option 2: Self-service networks
- 编辑 /etc/neutron/plugins/ml2/linuxbridge_agent.ini 配置 Linux Bridge Agent 大二层
 1
 2
 3
 4
 5
 6
 7
 8
 9
10
11
12
| [linux_bridge]
physical_interface_mappings = provider:ens37
[vxlan]
enable_vxlan = true
local_ip = 192.168.100.12
l2_population = true
# 启用 Linux 网桥 iptables 防火墙驱动程序
[securitygroup]
enable_security_group = true
firewall_driver = neutron.agent.linux.iptables_firewall.IptablesFirewallDriver
|
同样加载 br_netfilter 模块
编辑计算节点的 nova 配置文件 /etc/nova/nova.conf
1
2
3
4
5
6
7
8
9
| [neutron]
auth_url = http://controller:5000
auth_type = password
project_domain_name = default
user_domain_name = default
region_name = RegionOne
project_name = service
username = neutron
password = redhat
|
- 重启服务
1
2
| systemctl restart nova-compute
systemctl restart neutron-linuxbridge-agent
|
configure bash shell script: http://s1.kiosk007.top/config_compute_neutron.sh
验证
在控制节点
1
2
| openstack extension list --network
openstack network agent list
|
Cinder
注意:Cinder 服务对应的块存储服务本应该是部署在专门的存储服务集群的
安装:Install and configure a storage node
安装工具包
1
2
3
| apt install cinder-volume tgt
apt install lvm2 thin-provisioning-tools
apt install cinder-backup
|
配置 LVM
这块需要添加一块新的磁盘 /dev/sdb, 这里我们使用 vmware 可以直接添加一块新硬盘
 1
 2
 3
 4
 5
 6
 7
 8
 9
10
11
12
13
14
15
| # 查看当前的磁盘
fdisk -l /dev/sdb
Disk /dev/sdb: 5 GiB, 5368709120 bytes, 10485760 sectors
Disk model: VMware Virtual S
Units: sectors of 1 * 512 = 512 bytes
Sector size (logical/physical): 512 bytes / 512 bytes
I/O size (minimum/optimal): 512 bytes / 512 bytes
# 创建 VG
vgcreate cinder-volumes /dev/sdb
Physical volume "/dev/sdb" successfully created.
Volume group "cinder-volumes" successfully created
# 编辑 /etc/lvm/lvm.conf ,主要是为了加强安全性,如果不指定,所有的都可以访问,比如下面的 /dev/sdb 可以访问,其他全部拒绝
filter = [ "a/sdb/", "r/.*/"]
|
配置文件编辑
/etc/cinder/cinder.conf
 1
 2
 3
 4
 5
 6
 7
 8
 9
10
11
12
13
14
15
16
17
18
| [database]
connection = mysql+pymysql://cinder:CINDER_DBPASS@controller/cinder
[DEFAULT]
transport_url = rabbit://openstack:openstack@controller
my_ip = 192.168.100.12
enabled_backends = lvm
glance_api_servers = http://controller:9292
[lvm]
volume_driver = cinder.volume.drivers.lvm.LVMVolumeDriver
volume_group = cinder-volumes
target_protocol = iscsi
target_helper = tgtadm
[oslo_concurrency]
lock_path = /var/lib/cinder/tmp
|
重启服务
1
2
| systemctl restart tgt
systemctl restart cinder-volume
|
测试
 1
 2
 3
 4
 5
 6
 7
 8
 9
10
11
12
13
14
15
16
17
18
19
20
21
22
23
24
25
26
27
28
29
| cinder create --display-name testVloume 2
+--------------------------------+--------------------------------------+
| Property | Value |
+--------------------------------+--------------------------------------+
| attachments | [] |
| availability_zone | nova |
| bootable | false |
| cluster_name | None |
| consistencygroup_id | None |
...
| updated_at | 2022-09-04T09:23:07.000000 |
| user_id | aca26a682b4144989a20e4a3a6615279 |
| volume_type | __DEFAULT__ |
| volume_type_id | 3bd8f104-0a6e-4d01-8834-161452566435 |
+--------------------------------+--------------------------------------+
cinder list
+--------------------------------------+-----------+------------+------+----------------+-------------+----------+-------------+
| ID | Status | Name | Size | Consumes Quota | Volume Type | Bootable | Attached to |
+--------------------------------------+-----------+------------+------+----------------+-------------+----------+-------------+
| 539a7ef8-61e7-4531-b892-c2facafe28d9 | available | testVloume | 2 | True | __DEFAULT__ | false | |
+--------------------------------------+-----------+------------+------+----------------+-------------+----------+-------------+
# 查看卷
lvs
LV VG Attr LSize Pool Origin Data% Meta% Move Log Cpy%Sync Convert
cinder-volumes-pool cinder-volumes twi-aotz-- 4.75g 0.00 10.64
volume-539a7ef8-61e7-4531-b892-c2facafe28d9 cinder-volumes Vwi-a-tz-- 2.00g cinder-volumes-pool 0.00
|
Launch 一个实例
1. 创建Keypair
nova 可以将公钥注入到启动的虚拟机的实例中,可以实现免密登陆。所以需要我们提前将 keypair 添加nova管理。
1
2
3
4
5
6
7
8
| nova keypair-add --pub-key ~/.ssh/id_rsa.pub kiosk_key
nova keypair-list
+-----------+------+-------------------------------------------------+
| Name | Type | Fingerprint |
+-----------+------+-------------------------------------------------+
| kiosk_key | ssh | f1:95:82:17:4b:05:42:e3:c3:29:0d:d0:43:69:93:43 |
+-----------+------+-------------------------------------------------+
|
2. 创建 Flavor 模板
使用 nova flavor-list 命令可以查看当前支持的模板。
查看装机模板,比如 m1.tiny 类型,模板是 512MB内存1核1G。
类似我们在腾讯云上看到的核心搭配。
我们可以使用 nova flavor-create 来创建模板
1
2
3
4
5
6
7
| nova flavor-create --is-public true m1.tiny 6 128 1 1
+----+---------+------------+------+-----------+------+-------+-------------+-----------+-------------+
| ID | Name | Memory_MiB | Disk | Ephemeral | Swap | VCPUs | RXTX_Factor | Is_Public | Description |
+----+---------+------------+------+-----------+------+-------+-------------+-----------+-------------+
| 6 | m1.tiny | 128 | 1 | 0 | 0 | 1 | 1.0 | True | - |
+----+---------+------------+------+-----------+------+-------+-------------+-----------+-------------+
|
3. 创建网络
一般来说,租户可以创建自己的子网,子网可以连上一个外网实现上网。

- 创建一个外部网络
 1
 2
 3
 4
 5
 6
 7
 8
 9
10
11
12
13
14
15
16
17
18
19
20
21
22
23
24
25
26
27
28
29
| neutron net-create ext-net --shared --router:external=True
+---------------------------+--------------------------------------+
| Field | Value |
+---------------------------+--------------------------------------+
| admin_state_up | True |
| availability_zone_hints | |
| availability_zones | |
| created_at | 2022-09-03T04:10:26Z |
| description | |
| id | 2a5663f6-42c9-4b89-b920-3d67258751bd |
| ipv4_address_scope | |
| ipv6_address_scope | |
| is_default | False |
| mtu | 1450 |
| name | ext-net |
| port_security_enabled | True |
| project_id | e4b0206b8ac9460fbb9a1161200e60ad |
| provider:network_type | vxlan |
| provider:physical_network | |
| provider:segmentation_id | 92 |
| revision_number | 1 |
| router:external | True |
| shared | True |
| status | ACTIVE |
| subnets | |
| tags | |
| tenant_id | e4b0206b8ac9460fbb9a1161200e60ad |
| updated_at | 2022-09-03T04:10:26Z |
+---------------------------+--------------------------------------+
|
创建完成之后可以通过 neutron net-list 查看
- 创建外部网络子网
 1
 2
 3
 4
 5
 6
 7
 8
 9
10
11
12
13
14
15
16
17
18
19
20
21
22
23
24
25
26
27
28
29
30
| neutron subnet-create ext-net \
> --name ext-subnet \
> --allocation-pool start=192.168.200.100,end=192.168.200.190 \
> --disable-dhcp --gateway 192.168.101.1 192.168.0.0/16
Created a new subnet:
+-------------------+--------------------------------------------------------+
| Field | Value |
+-------------------+--------------------------------------------------------+
| allocation_pools | {"start": "192.168.200.100", "end": "192.168.200.190"} |
| cidr | 192.168.0.0/16 |
| created_at | 2022-09-03T04:28:49Z |
| description | |
| dns_nameservers | |
| enable_dhcp | False |
| gateway_ip | 192.168.101.1 |
| host_routes | |
| id | 5e268dc4-8bdc-4019-8224-b3535eb795f9 |
| ip_version | 4 |
| ipv6_address_mode | |
| ipv6_ra_mode | |
| name | ext-subnet |
| network_id | f873449b-5067-4b6d-9935-d7aa468a72c8 |
| project_id | e4b0206b8ac9460fbb9a1161200e60ad |
| revision_number | 0 |
| service_types | |
| subnetpool_id | |
| tags | |
| tenant_id | e4b0206b8ac9460fbb9a1161200e60ad |
| updated_at | 2022-09-03T04:28:49Z |
+-------------------+--------------------------------------------------------+
|
创建完成之后可以通过 neutron subnet-list 查看
- 创建内部租户网络(可以使用普通租户帐号)
1
2
3
4
5
| # 创建名为 tenant-net 的租户网络
neutron net-create tenant-net
# 创建名为 tenant-subnet 的租户子网,网段为10.0.0.0/24
neutron subnet-create tenant-net --name tenant-subnet --gateway 10.0.0.1 10.0.0.0/24
|
- 创建一个路由器,并添加到外部网络
 1
 2
 3
 4
 5
 6
 7
 8
 9
10
11
12
13
14
15
16
17
18
19
20
21
22
23
24
25
| # 创建一个路由器
neutron router-create router1
Created a new router:
+-------------------------+--------------------------------------+
| Field | Value |
+-------------------------+--------------------------------------+
| admin_state_up | True |
| availability_zone_hints | |
| availability_zones | |
...
| tenant_id | e4b0206b8ac9460fbb9a1161200e60ad |
| updated_at | 2022-09-03T04:32:50Z |
+-------------------------+--------------------------------------+
# 路由器连上外部网络
neutron router-gateway-set router1 ext-net
Set gateway for router router1
# 查看外部网络分配的地址
neutron router-port-list router1
+--------------------------------------+------+-----------+-------------------+----------------------------------------------------------------------------------------+
| id | name | tenant_id | mac_address | fixed_ips |
+--------------------------------------+------+-----------+-------------------+----------------------------------------------------------------------------------------+
| 04b6bafe-f45a-4531-80be-d7972753fd87 | | | fa:16:3e:eb:d4:a4 | {"subnet_id": "5e268dc4-8bdc-4019-8224-b3535eb795f9", "ip_address": "192.168.200.176"} |
+--------------------------------------+------+-----------+-------------------+----------------------------------------------------------------------------------------+
|
此时可以查看到创建后的效果,其软路由就是用 netns 来实现的。netns 上甚至可以添加 iptables 规则等。
 1
 2
 3
 4
 5
 6
 7
 8
 9
10
11
12
13
14
15
16
17
| # 将内网的网关也加入到路由器上
neutron router-interface-add router1 tenant-subnet
Added interface 25537718-780c-4394-a1dc-9155beb1f8ae to router router1.
# 此时 router1 连通了两个网络,即 ext-net 和 tenant-net
# 使用 ip netns 可以查看到
ip netns list
qrouter-9b16b8e7-6b0c-4ad6-ad3d-f3b800bb3da5 (id: 1)
qdhcp-3a0f0c66-dae5-4ca6-a682-08be3349127b (id: 0)
neutron router-port-list router1
+--------------------------------------+------+----------------------------------+-------------------+----------------------------------------------------------------------------------------+
| id | name | tenant_id | mac_address | fixed_ips |
+--------------------------------------+------+----------------------------------+-------------------+----------------------------------------------------------------------------------------+
| 04b6bafe-f45a-4531-80be-d7972753fd87 | | | fa:16:3e:eb:d4:a4 | {"subnet_id": "5e268dc4-8bdc-4019-8224-b3535eb795f9", "ip_address": "192.168.200.176"} |
| 25537718-780c-4394-a1dc-9155beb1f8ae | | e4b0206b8ac9460fbb9a1161200e60ad | fa:16:3e:53:8e:76 | {"subnet_id": "87e628e0-ceca-4658-83a4-b70b762c3d61", "ip_address": "10.0.0.1"} |
+--------------------------------------+------+----------------------------------+-------------------+----------------------------------------------------------------------------------------+
|
4. 启动虚拟机
期间遇到 openstack 总是调度中,无法启动的问题,其实是配置配错了。通过 https://blog.silversky.moe/works/openstack-lanuch-instance-infinite-scheduling 排查解决
1
| nova boot --flavor m1.tiny --image cirros-nocloud --nic net-id f873449b-5067-4b6d-9935-d7aa468a72c8 --security-group default --key-name kiosk_key vm001
|
5. 查看虚拟机
 1
 2
 3
 4
 5
 6
 7
 8
 9
10
11
12
13
| nova list
+--------------------------------------+-------+--------+------------+-------------+-----------------------+
| ID | Name | Status | Task State | Power State | Networks |
+--------------------------------------+-------+--------+------------+-------------+-----------------------+
| 3bbb4691-9246-40d1-8d21-63de864483d5 | vm001 | ACTIVE | - | Running | tenant-net=10.0.0.186 |
+--------------------------------------+-------+--------+------------+-------------+-----------------------+
# 计算节点执行
virsh list
Id Name State
-----------------------------------
1 instance-0000000b running
|
6. 绑定 floatingip
floating ip 的含义是可以让外部直接访问到某个虚拟机实例,比如这样就让我可以在 ext-net上 使用公网IP直接 ssh 到 vm 上。
 1
 2
 3
 4
 5
 6
 7
 8
 9
10
11
12
13
14
15
16
17
18
19
20
21
22
23
| # 或使用 openstack floating ip create public
neutron floatingip-create ext-net
Created a new floatingip:
+---------------------+--------------------------------------+
| Field | Value |
+---------------------+--------------------------------------+
| created_at | 2022-09-04T03:24:56Z |
| description | |
| fixed_ip_address | |
| floating_ip_address | 192.168.200.137 |
| floating_network_id | f873449b-5067-4b6d-9935-d7aa468a72c8 |
| id | 69b114d2-ead5-4ba2-9e9f-4726464df678 |
| port_details | |
| port_id | |
| project_id | e4b0206b8ac9460fbb9a1161200e60ad |
| revision_number | 0 |
| router_id | |
| status | DOWN |
| tags | |
| tenant_id | e4b0206b8ac9460fbb9a1161200e60ad |
| updated_at | 2022-09-04T03:24:56Z |
+---------------------+--------------------------------------+
|
查看之前新建的 floatingip ,并且将floatingip 绑定
 1
 2
 3
 4
 5
 6
 7
 8
 9
10
11
12
13
14
15
16
17
18
19
20
21
22
23
24
25
26
27
28
| # 查看浮动IP 列表
openstack floating ip list
+--------------------------------------+---------------------+------------------+------+--------------------------------------+----------------------------------+
| ID | Floating IP Address | Fixed IP Address | Port | Floating Network | Project |
+--------------------------------------+---------------------+------------------+------+--------------------------------------+----------------------------------+
| 69b114d2-ead5-4ba2-9e9f-4726464df678 | 192.168.200.137 | None | None | f873449b-5067-4b6d-9935-d7aa468a72c8 | e4b0206b8ac9460fbb9a1161200e60ad |
+--------------------------------------+---------------------+------------------+------+--------------------------------------+----------------------------------+
# 查看主机列表
openstack server list
+--------------------------------------+-------+--------+-----------------------+----------------+---------+
| ID | Name | Status | Networks | Image | Flavor |
+--------------------------------------+-------+--------+-----------------------+----------------+---------+
| 3bbb4691-9246-40d1-8d21-63de864483d5 | vm001 | ACTIVE | tenant-net=10.0.0.186 | cirros-nocloud | m1.tiny |
+--------------------------------------+-------+--------+-----------------------+----------------+---------+
# 绑定
openstack server add floating ip vm001 192.168.200.137
# 再次查看
openstack server list
+--------------------------------------+-------+--------+----------------------------------------+----------------+---------+
| ID | Name | Status | Networks | Image | Flavor |
+--------------------------------------+-------+--------+----------------------------------------+----------------+---------+
| 3bbb4691-9246-40d1-8d21-63de864483d5 | vm001 | ACTIVE | tenant-net=10.0.0.186, 192.168.200.137 | cirros-nocloud | m1.tiny |
+--------------------------------------+-------+--------+----------------------------------------+----------------+---------+
|
参考 IP地址管理
7. 关联 volume
 1
 2
 3
 4
 5
 6
 7
 8
 9
10
11
12
13
14
15
16
17
18
19
20
| cinder list
+--------------------------------------+-----------+------------+------+----------------+-------------+----------+-------------+
| ID | Status | Name | Size | Consumes Quota | Volume Type | Bootable | Attached to |
+--------------------------------------+-----------+------------+------+----------------+-------------+----------+-------------+
| 539a7ef8-61e7-4531-b892-c2facafe28d9 | available | testVloume | 2 | True | __DEFAULT__ | false | |
+--------------------------------------+-----------+------------+------+----------------+-------------+----------+-------------+
nova volume-attach vm001 539a7ef8-61e7-4531-b892-c2facafe28d9
+-----------------------+--------------------------------------+
| Property | Value |
+-----------------------+--------------------------------------+
| delete_on_termination | False |
| device | /dev/vdb |
| id | 539a7ef8-61e7-4531-b892-c2facafe28d9 |
| serverId | 3bbb4691-9246-40d1-8d21-63de864483d5 |
| tag | - |
| volumeId | 539a7ef8-61e7-4531-b892-c2facafe28d9 |
+-----------------------+--------------------------------------+
|
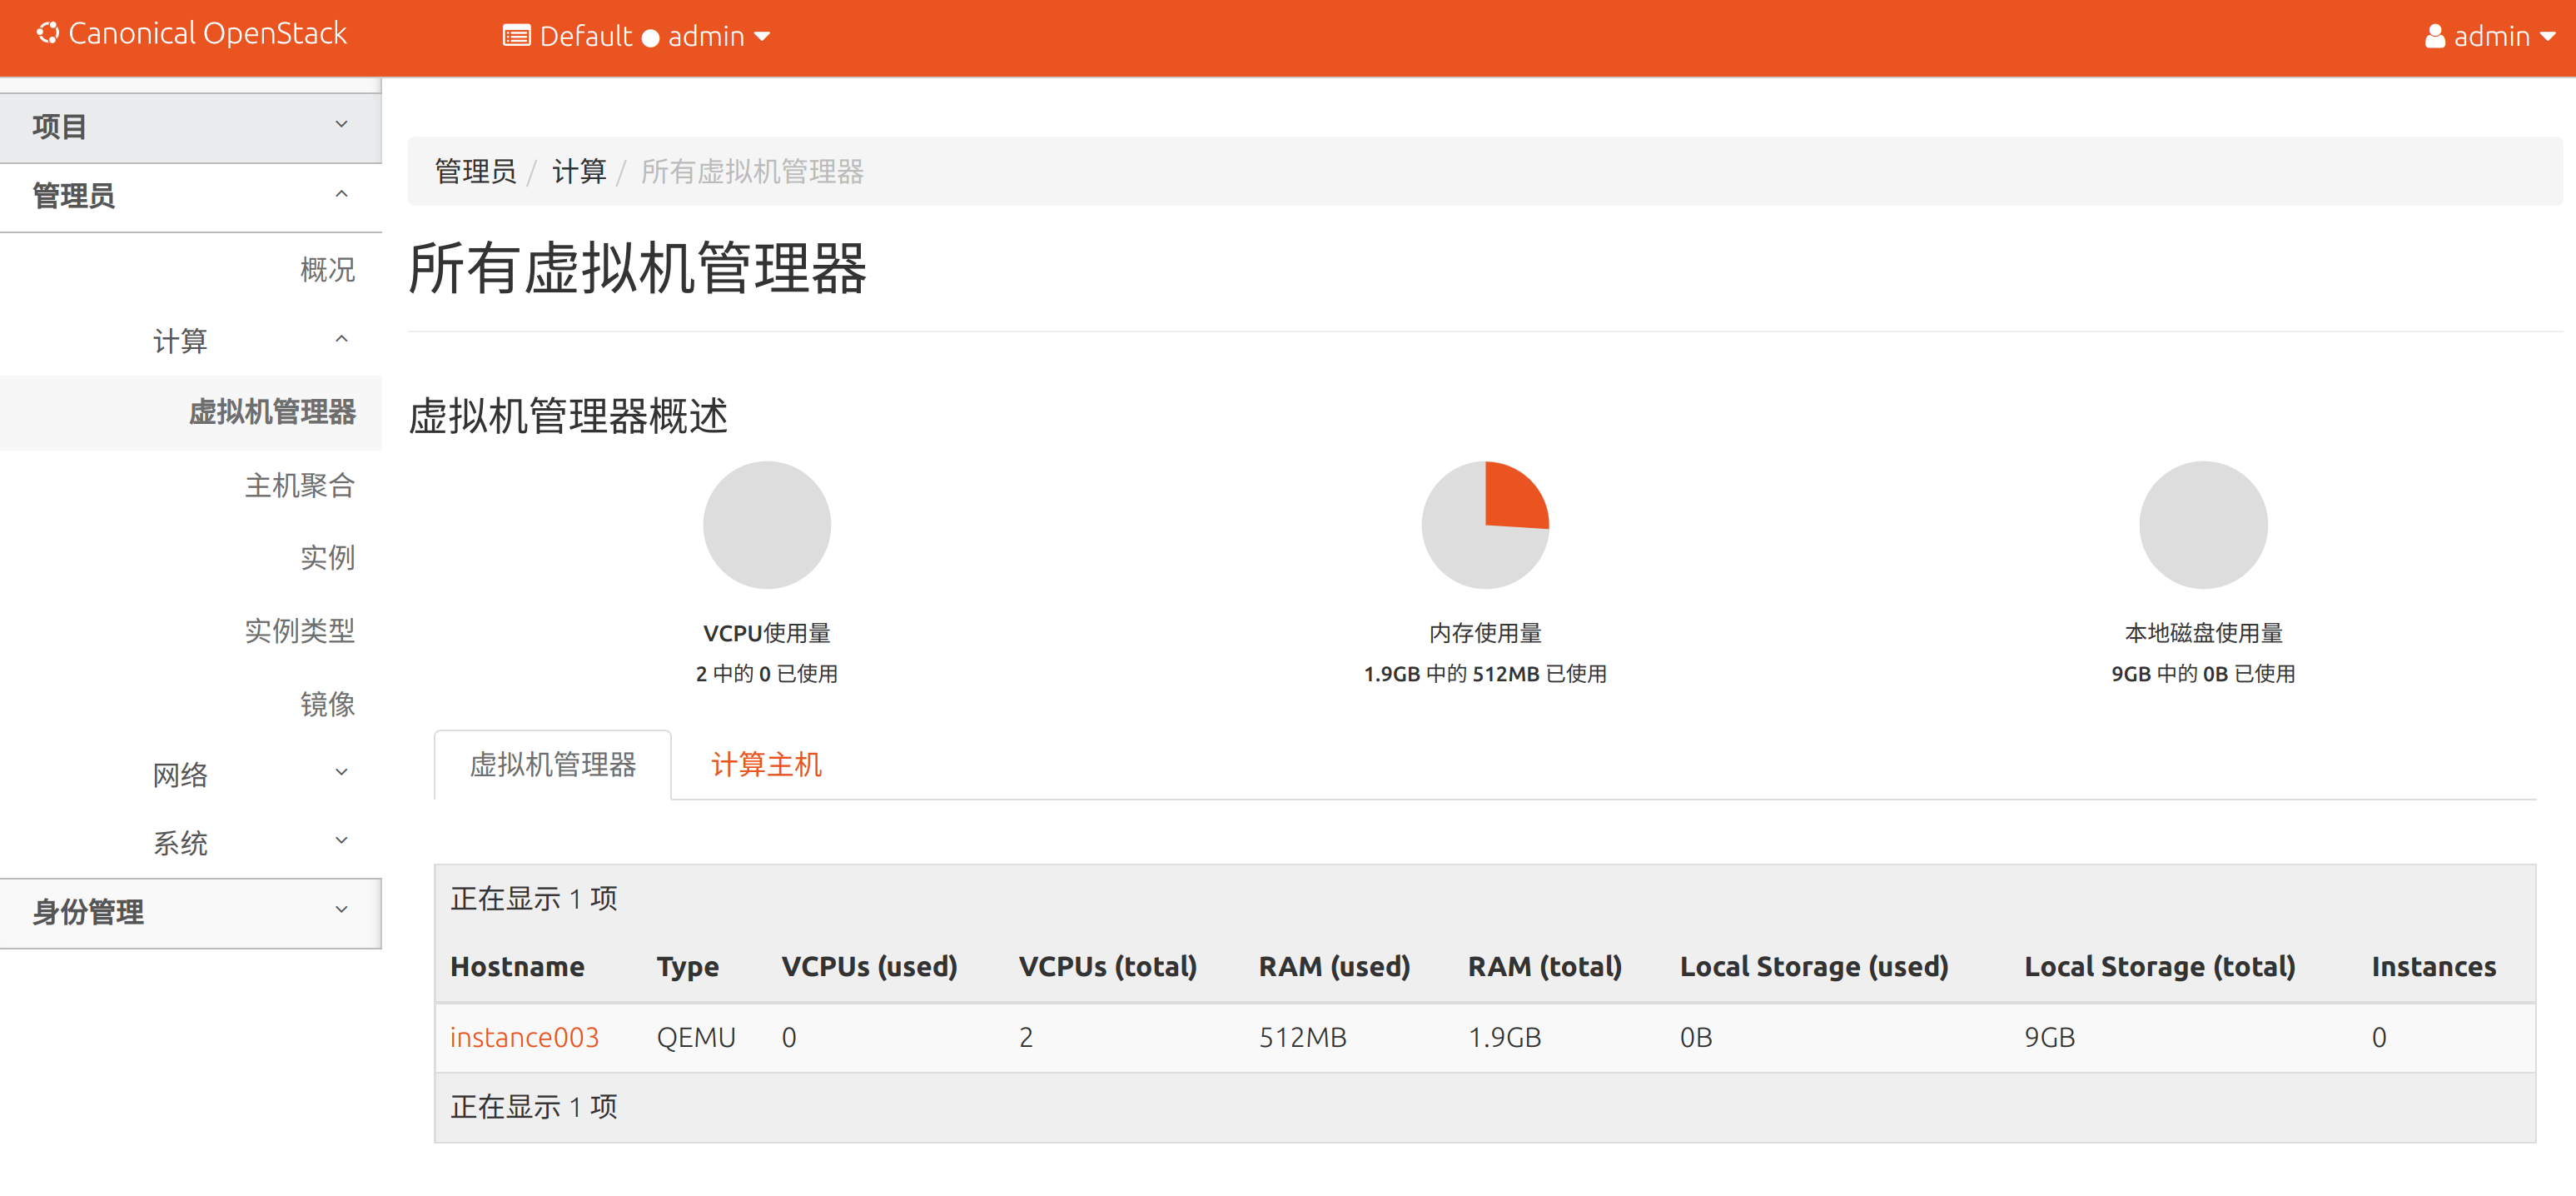
Dashboard 管理
当部署完 Horizon 后,就可以通过 Web界面管理虚拟机了。通过 http://controller/horizon/ 访问,认证信息使用 admin 和 ADMIN_PASS 选择 default domain 即可。
比如可以查看计算资源池
虚拟机地址: 10.0.0.186
可以ping 通网关 10.0.0.1 ,也可以 ping 通ext-net 上的 192.168.200.176


